Author: iafwizdoe2ej

  • BlazorMarkdownEditor

    Blazor Markdown Editor

    This is a Markdown Editor component for Blazor WebAssembly and Blazor Server with .NET8. The component is based on EasyMDE version 1.0.x to create the editor. I decided to create my repository for the JavaScript library because I wanted to have control over the updates and the changes. The component is a wrapper around the JavaScript library and it is a Blazor component that allows you to use the Markdown Editor in your Blazor application.

    For more documentation and help this component, visit the post I created here.

    markdown-editor-blazor-logo

    Try Markdown Editor online (upload is not enabled)

    Usage

    Add the Editor to your _Imports.razor

    @using PSC.Blazor.Components.MarkdownEditor 
    @using PSC.Blazor.Components.MarkdownEditor.EventsArgs
    

    Then, in your index.html, host.html or App.razor add those lines:

    <link href="https://github.com/_content/PSC.Blazor.Components.MarkdownEditor/css/markdowneditor.css" rel="stylesheet" />
    <link href="http://github.com/_content/PSC.Blazor.Components.MarkdownEditor/css/easymde.min.css" rel="stylesheet" />
    
    <script src="https://github.com/_content/PSC.Blazor.Components.MarkdownEditor/js/easymde.min.js"></script>
    <script src="/_content/PSC.Blazor.Components.MarkdownEditor/js/markdownEditor.js"></script>
    

    Remember that jQuery is also required. The component contains the Easy Markdown Editor script version 1.0.x that is also maintain by myself. You can add this script in your project but if you use the script in the component, you are sure it works fine and all functionalities are tested.

    The CSS markdowneditor.css contains the style for same of the new tags I added in the Markdown Editor such as att, note, tip, warn and video.

    Add MarkdownEditor in a page

    In a Razor page, we can add the component with these lines

    <div class="col-md-12">
        <MarkdownEditor @bind-Value="@markdownValue" 
                        ValueHTMLChanged="@OnMarkdownValueHTMLChanged" />
    
        <hr />
    
        <h3>Result</h3>
        @((MarkupString)markdownHtml)
    </div>
    
    @code {
        string markdownValue = "#Markdown Editor\nThis is a test";
        string markdownHtml;
    
        Task OnMarkdownValueChanged(string value)
        {
            return Task.CompletedTask;
        }
    
        Task OnMarkdownValueHTMLChanged(string value)
        {
            markdownHtml = value;
            return Task.CompletedTask;
        }
    }
    

    The main different between value and ValueHTMLChanged is that Value return the text written in the editor as a string whereas ValueHTMLChanged returns the rendered HTML code for the text. The ValueHTMLChanged includes the code for displaying mermaid graphs in a SVG tag.

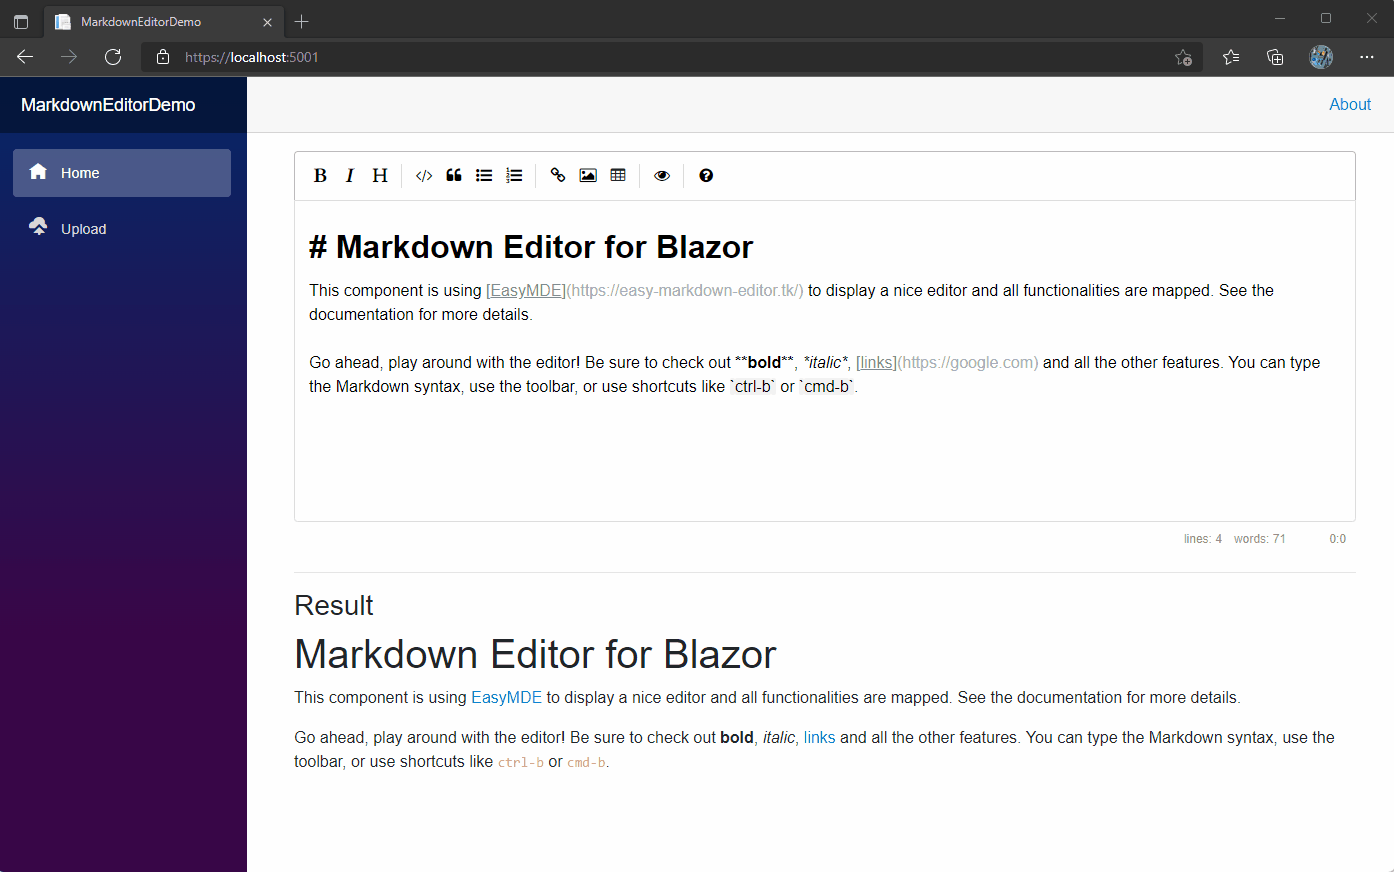
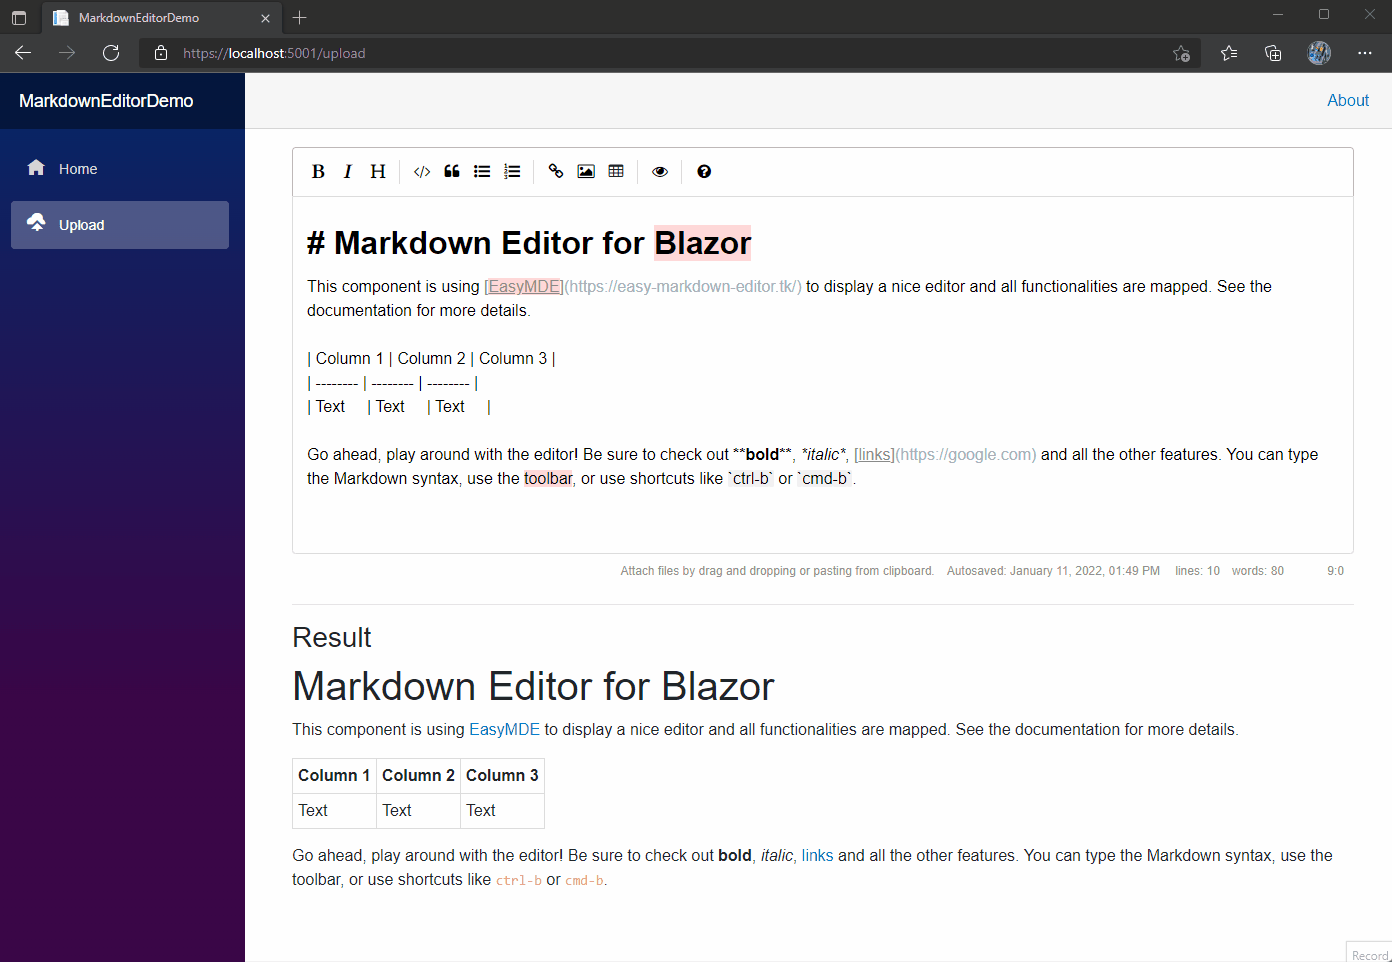
    The result is a nice Markdown Editor like in the following screenshot. This is a screenshot from the demo in this repository.

    markdown-editor-example

    Add a custom toolbar

    In your Markdown Editor add the following code

    <MarkdownEditor @bind-Value="@markdownValue"
                    ValueHTMLChanged="@OnMarkdownValueHTMLChanged"
                    SpellChecker="false"
                    CustomButtonClicked="@OnCustomButtonClicked">
        <Toolbar>
            <MarkdownToolbarButton Action="MarkdownAction.Bold" Icon="fa fa-bolt" Title="Bold" />
            <MarkdownToolbarButton Separator Name="Custom button" 
                                   Value="@("Hello from your custom Toolbar Button")" 
                                   Icon="fa fa-star" 
                                   Title="A Custom Button" />
            <MarkdownToolbarButton Separator Name="https://github.com/erossini/BlazorMarkdownEditor" 
                                   Icon="fa fab fa-github" Title="A Custom Link" />
        </Toolbar>
    </MarkdownEditor>
    
    @code {
        // omitted code...
    
        Task OnCustomButtonClicked(MarkdownButtonEventArgs eventArgs)
        {
            Console.WriteLine("OnCustomButtonClicked -> " + eventArgs.Value);
            buttonText += "OnCustomButtonClicked -> " + eventArgs.Value + "<br />";
    
            return Task.CompletedTask;
        }
    }
    

    In the tag MarkdownEditor, you add the new tab Toolbar that contains one or more MarkdownToolbarButton.

    Each MarkdownToolbarButton can have one of the default Action (see table below) or a custom value for example a link to a website. If you want to display before a MarkdownToolbarButton a vertical line, add the property Separator in the MarkdownToolbarButton.

    Change the content after the first init

    In same cases, you want to refresh the content of the Markdown Editor after the first init, for example because your application has to read the value from an API and it takes time. For that, you have to add a ref to the MarkdownEditor and then use it to call SetValueAsync property, as in the following code

    <MarkdownEditor @bind-Value="@markdownValue"
                    ValueHTMLChanged="@OnMarkdownValueHTMLChanged"
                    SpellChecker="false" @ref="Markdown1" />
    
    @code {
        MarkdownEditor Markdown1;
    
        // omitted code...
    
        async Task ChangeText()
        {
            markdownValue = "Test!";
            await Markdown1.SetValueAsync(markdownValue);
        }
    }
    

    Add Mermaid render

    In order to add more functionaties to the component, it includes the version of mermaid.js 10.2.1 that allows to add impressive diagrams and chart in the Markdown component like

    • Flowchart
    • Sequence Diagram
    • Class Diagram
    • State Diagram
    • Entity Relationship Diagram
    • User Journey
    • Gantt
    • Pie Chart
    • Quadrant Chart
    • Requirement Diagram
    • Gitgraph (Git) Diagram
    • C4C Diagram (Context) Diagram
    • Mindmaps
    • Timeline

    To add this functionality to the Markdown Editor, it is enough to add in the index.html this script

    <script src="/_content/PSC.Blazor.Components.MarkdownEditor/js/mermaid.min.js"></script>

    The script will check if this library is called. If it is added to the page, the Markdown Editor automatically will add a button in the toolbar to insert the tag for mermaid. That tag is

        ```mermaid
        ```
    

    Warning

    Using this script in the component

    <script src="https://github.com/_content/PSC.Blazor.Components.MarkdownEditor/js/easymde.min.js"></script>
    

    or the cdn

    <script src="https://cdn.jsdelivr.net/npm/mermaid/dist/mermaid.min.js"></script>
    

    the mermaid render will not work. The error is

    e.replace is not a function

    So, I recommend to upgrade the script with the new one as I describe in the following paragraph.

    Upgrade to version 10.9.1 or above

    Using the new version of Mermaid from the 10.9.1 requires adding this code in the index.html, host.html or App.razor

    <script type="module">
        import mermaid 
            from 'https://cdn.jsdelivr.net/npm/mermaid@10/dist/mermaid.esm.min.mjs';
        mermaid.initialize({ startOnLoad: true });
    </script>

    At the moment, I’m trying to find a way to include this script in the markdownEditor.js but I’m not sure it will work.

    An example of the mermaid graphs

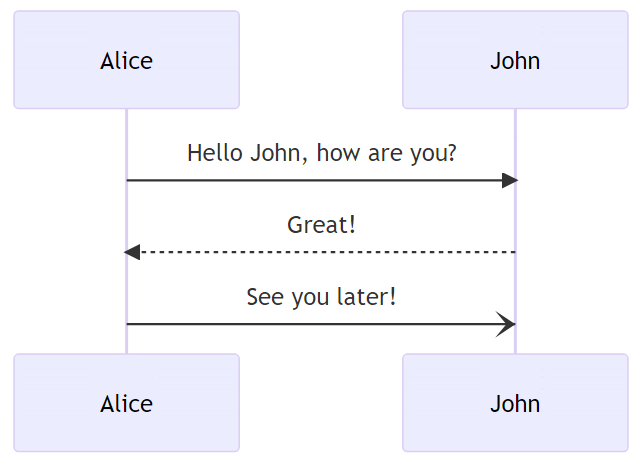
    A Sequence diagram is an interaction diagram that shows how processes operate with one another and in what order.

    sequenceDiagram
        Alice->>John: Hello John, how are you?
        John-->>Alice: Great!
        Alice-)John: See you later!
    
    Loading

    Sequence diagram

    A Gantt chart is useful for tracking the amount of time it would take before a project is finished, but it can also be used to graphically represent “non-working days”, with a few tweaks.

    gantt
        title A Gantt Diagram
        dateFormat  YYYY-MM-DD
        section Section
        A task           :a1, 2014-01-01, 30d
        Another task     :after a1  , 20d
        section Another
        Task in sec      :2014-01-12  , 12d
        another task      : 24d
    
    Loading

    Gantt chart

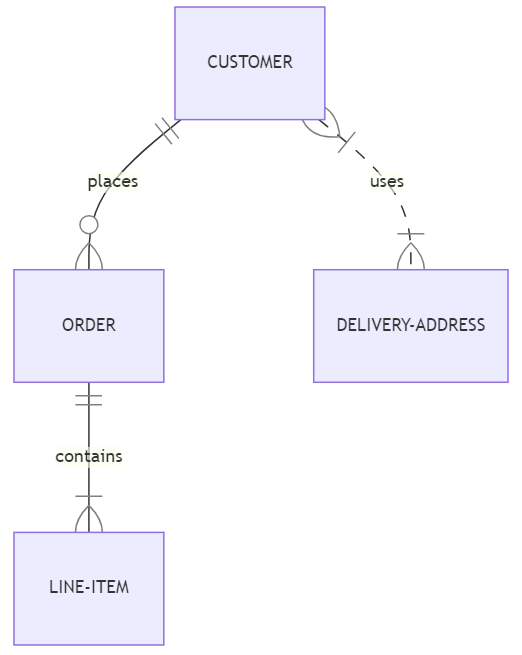
    An entity–relationship model (or ER model) describes interrelated things of interest in a specific domain of knowledge. A basic ER model is composed of entity types (which classify the things of interest) and specifies relationships that can exist between entities (instances of those entity types).

    erDiagram
        CUSTOMER ||--o{ ORDER : places
        ORDER ||--|{ LINE-ITEM : contains
        CUSTOMER }|..|{ DELIVERY-ADDRESS : uses
    
    Loading

    entity–relationship model

    Add Highlight.js

    This script is not included in the component but the component can detect if Highlight.js is loaded. In this case, the Markdown Editor renders also the code in one of the supported languages.

    To enable this function, add the script in your project and then in the index.html add the following lines

    <link rel="stylesheet" href="https://github.com/path/to/styles/default.min.css">
    <script src="/path/to/highlight.min.js"></script>
    

    Known issue using mermaid and Highlight.js

    If both libraries are loaded in the index.html, the mermaid render will not work.

    Alerts

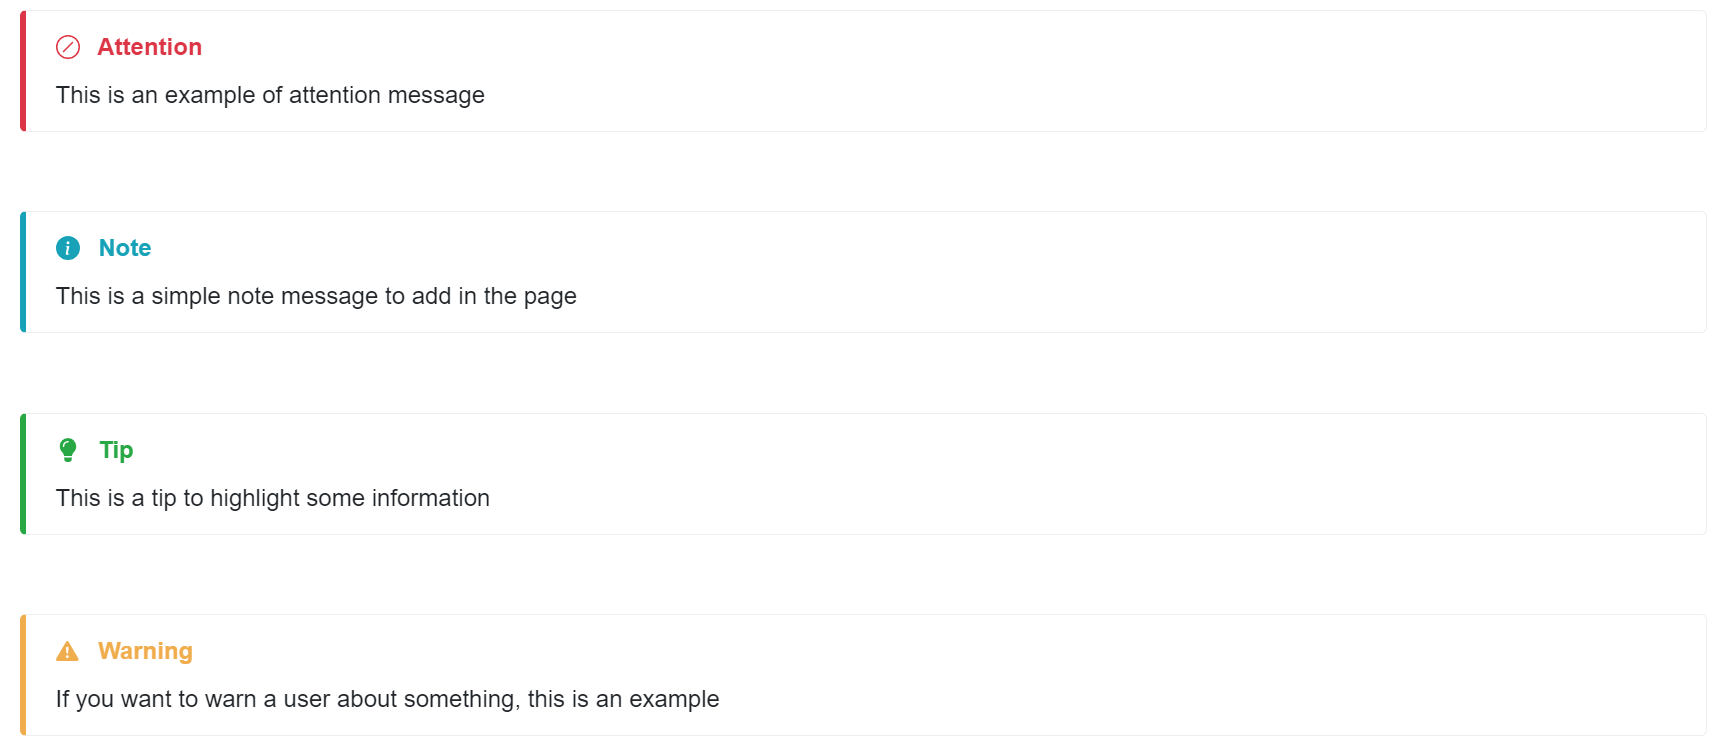
    In the Markdown, there are some missing tags to display some useful information on the page like a highlight note, a tip, a warning or an attention message. So, I added them in this Markdown Editor. An example of the result of this implementation is in the following screenshot.

    Alerts

    To add the message, click on the icons in the toolbar in the editor or add those commands:

    Command Color Description
    “`att Red Display an attention message
    “`note Azure Add a note in the document
    “`tip Green Shows a tip message
    “`warn Orange This is a warning message

    In the Markdown Editor component, there is a CSS for the them called alert.css and you can add it to the index.html with this line if you haven’t add the markdowneditor.css

    <link href="https://github.com/_content/PSC.Blazor.Components.MarkdownEditor/css/alert.css" rel="stylesheet" />
    

    Clean saved documentation

    By default, the Markdown Editor saves the text in the browser local storage.

    The AutoSaveEnabled is True and the AutoSaveSubmitDelay is set up to 5000 milliseconds. This means that the text is saved every 5 seconds.

    If you want to clean the saved text, you can use the following code

    <MarkdownEditor @bind-Value="@markdownValue" MaxHeight="300px"
                    ValueHTMLChanged="@OnMarkdownValueHTMLChanged"
                    SpellChecker="false" @ref="Markdown1" 
                    AutoSaveEnabled="true" />
    
    @code {
        MarkdownEditor Markdown1;
    
        async Task DeleteStorage()
        {
            await Markdown1.CleanAutoSave();
        }
    }
    

    Video

    In the Markdown Editor, you can add a video in the text. The video can be from YouTube, Vimeo or any other video provider. The video is displayed in the editor and in the rendered HTML code.

        ```video
    	
        ```
    

    Documentation

    The Markdown Editor for Blazor has a estensive collection of properties to map all the functionalities in the JavaScript version. In this repository, there are 2 projects:

    • MarkdownEditorDemo is a Blazor Web Assembly project that contains 2 pages: Index.razor where I show how to use the component with the basic functions and Upload.razor that shows how to cope with the image upload. To test the upload, the project MarkdownEditorDemo.Api must run
    • MarkdownEditorDemo.Api this is an ASP.NET Core WebApi (.NET6) how to implement a proper API for uploading images. For more details, I wrote a post about Uploading image with .NET.

    Properties

    Name Description Type Default
    AutoSaveEnabled Gets or sets the setting for the auto save. Saves the text that’s being written and will load it back in the future. It will forget the text when the form it’s contained in is submitted. Recommended to choose a unique ID for the Markdown Editor. bool false
    AutoSaveId Gets or sets the automatic save identifier. You must set a unique string identifier so that the component can autosave. Something that separates this from other instances of the component elsewhere on your website. string Default value
    AutoSaveDelay Delay between saves, in milliseconds. Defaults to 10000 (10s). int 10000 (10s)
    AutoSaveSubmitDelay Delay before assuming that submit of the form failed and saving the text, in milliseconds. int 5000 (5s)
    AutoSaveText Text for autosave string Autosaved:
    AutoSaveTimeFormatLocale Set the format for the datetime to display. For more info, see the JavaScript documentation DateTimeFormat instances string en-US
    AutoSaveTimeFormatYear Set the format for the year string numeric
    AutoSaveTimeFormatMonth Set the format for the month string long
    AutoSaveTimeFormatDay Set the format for the day string 2-digit
    AutoSaveTimeFormatHour Set the format for the hour string 2-digit
    AutoSaveTimeFormatMinute Set the format for the minute string 2-digit
    AutoDownloadFontAwesome If set to true, force downloads Font Awesome (used for icons). If set to false, prevents downloading. bool? null
    CharactersStatusText Set the words to display in the statusbar for the character’s counting string characters:
    CustomButtonClicked Occurs after the custom toolbar button is clicked. EventCallback
    CustomImageUpload Sets a custom image upload handler
    Direction rtl or ltr. Changes text direction to support right-to-left languages. Defaults to ltr. string ltr
    ErrorMessages Errors displayed to the user, using the errorCallback option, where image_name, image_size and image_max_size will be replaced by their respective values, that can be used for customization or internationalization. MarkdownErrorMessages
    HideIcons An array of icon names to hide. Can be used to hide specific icons shown by default without completely customizing the toolbar. string[] ‘side-by-side’, ‘fullscreen’
    ImageAccept A comma-separated list of mime-types used to check image type before upload (note: never trust client, always check file types at server-side). Defaults to image/png, image/jpeg, image/jpg, image.gif. string image/png, image/jpeg, image/jpg, image.gif
    ImageCSRFToken CSRF token to include with AJAX call to upload image. For instance, used with Django backend. string
    ImageMaxSize Maximum image size in bytes, checked before upload (note: never trust client, always check image size at server-side). Defaults to 1024 * 1024 * 2 (2Mb). long 1024 * 1024 * 2 (2Mb)
    ImagePathAbsolute If set to true, will treat imageUrl from imageUploadFunction and filePath returned from imageUploadEndpoint as an absolute rather than relative path, i.e. not prepend window.location.origin to it. string
    ImageTexts Texts displayed to the user (mainly on the status bar) for the import image feature, where image_name, image_size and image_max_size will be replaced by their respective values, that can be used for customization or internationalization. MarkdownImageTexts null
    ImageUploadAuthenticationSchema If an authentication for the API is required, assign to this property the schema to use. Bearer is the common one. string empty
    ImageUploadAuthenticationToken If an authentication for the API is required, assign to this property the token string empty
    LineNumbers If set to true, enables line numbers in the editor. bool false
    LinesStatusText Set the words to display in the statusbar for the line’s counting string lines:
    LineWrapping If set to false, disable line wrapping. Defaults to true. bool false
    MarkdownUrl Set the URL for the Markdown guide. Link to Markdown Guide
    MaxHeight Sets fixed height for the composition area. minHeight option will be ignored. Should be a string containing a valid CSS value like “500px”. Defaults to undefined. string
    MaxUploadImageMessageSize Gets or sets the max message size when uploading the file. long 20 * 1024
    MinHeight Sets the minimum height for the composition area, before it starts auto-growing. Should be a string containing a valid CSS value like “500px”. Defaults to “300px”. string 300px
    NativeSpellChecker Enable (true) or disable (false) the spell check in the editor bool True
    Placeholder If set, displays a custom placeholder message. string null
    SegmentFetchTimeout Gets or sets the Segment Fetch Timeout when uploading the file. TimeSpan 1 min
    ShowIcons An array of icon names to show. Can be used to show specific icons hidden by default without completely customizing the toolbar. string[] ‘code’, ‘table’
    SpellChecker Enable (true) or disable (false) the spell check in the editor bool True
    TabSize If set, customize the tab size. Defaults to 2. int 2
    Theme Override the theme. Defaults to easymde. string easymde
    Toolbar [Optional] Gets or sets the content of the toolbar. RenderFragment
    ToolbarTips If set to false, disable toolbar button tips. Defaults to true. bool true
    UploadImage If set to true, enables the image upload functionality, which can be triggered by drag-drop, copy-paste and through the browse-file window (opened when the user clicks on the upload-image icon). Defaults to false. bool false
    Value Gets or sets the markdown value. string null
    ValueHTML Gets the HTML from the markdown value. string null
    WordsStatusText Set the words to display in the statusbar for the word’s counting string words:

    Events

    Name Description Type
    ErrorCallback A callback function used to define how to display an error message. Defaults to (errorMessage) => alert(errorMessage). Func<string, Task>
    ImageUploadChanged Occurs every time the selected image has changed. Func<FileChangedEventArgs, Task>
    ImageUploadEnded Occurs when an individual image upload has ended. Func<FileEndedEventArgs, Task>
    ImageUploadEndpoint The endpoint where the images data will be sent, via an asynchronous POST request. The server is supposed to save this image, and return a json response. string
    ImageUploadProgressed Notifies the progress of image being written to the destination stream. Func<FileProgressedEventArgs, Task>
    ImageUploadStarted Occurs when an individual image upload has started. Func<FileStartedEventArgs, Task>
    ValueChanged An event that occurs after the markdown value has changed. EventCallback
    ValueHTMLChanged An event that occurs after the markdown value has changed and the new HTML code is available. EventCallback

    Upload file

    The Markdown Editor for Blazor can take care of uploading a file and add the relative Markdown code in the editor. For that, the property UploadImage has to set to true. Also, the upload API must be specified in the property ImageUploadEndpoint. In some cases, the API requires an authentication. The properties ImageUploadAuthenticationSchema and ImageUploadAuthenticationToken allow you to pass the correct schema and token to use in the call.

    Those values will be added to the HttpClient POST request in the header. Only if both properties are not null, they will be added to the header.

    markdown-editor-upload-image

    If you want to understand better how to create the API for the upload, I have created a specific post on PureSourceCode.

    Toolbar icons

    Below are the built-in toolbar icons (only some of which are enabled by default), which can be reorganized however you like. “Name” is the name of the icon, referenced in the JS. “Action” is either a function or a URL to open. “Class” is the class given to the icon. “Tooltip” is the small tooltip that appears via the title="" attribute. Note that shortcut hints are added automatically and reflect the specified action if it has a key bind assigned to it (i.e. with the value of action set to bold and that of tooltip set to Bold, the final text the user will see would be “Bold (Ctrl-B)”).

    Additionally, you can add a separator between any icons by adding "|" to the toolbar array.

    Name Action Tooltip
    Class
    bold toggleBold Bold
    fa fa-bold
    italic toggleItalic Italic
    fa fa-italic
    strikethrough toggleStrikethrough Strikethrough
    fa fa-strikethrough
    heading toggleHeadingSmaller Heading
    fa fa-header
    heading-smaller toggleHeadingSmaller Smaller Heading
    fa fa-header
    heading-bigger toggleHeadingBigger Bigger Heading
    fa fa-lg fa-header
    heading-1 toggleHeading1 Big Heading
    fa fa-header header-1
    heading-2 toggleHeading2 Medium Heading
    fa fa-header header-2
    heading-3 toggleHeading3 Small Heading
    fa fa-header header-3
    code toggleCodeBlock Code
    fa fa-code
    quote toggleBlockquote Quote
    fa fa-quote-left
    unordered-list toggleUnorderedList Generic List
    fa fa-list-ul
    ordered-list toggleOrderedList Numbered List
    fa fa-list-ol
    clean-block cleanBlock Clean block
    fa fa-eraser
    link drawLink Create Link
    fa fa-link
    image drawImage Insert Image
    fa fa-picture-o
    table drawTable Insert Table
    fa fa-table
    horizontal-rule drawHorizontalRule Insert Horizontal Line
    fa fa-minus
    preview togglePreview Toggle Preview
    fa fa-eye no-disable
    side-by-side toggleSideBySide Toggle Side by Side
    fa fa-columns no-disable no-mobile
    fullscreen toggleFullScreen Toggle Fullscreen
    fa fa-arrows-alt no-disable no-mobile
    guide This link Markdown Guide
    fa fa-question-circle

    Keyboard shortcuts

    EasyMDE comes with an array of predefined keyboard shortcuts, but they can be altered with a configuration option. The list of default ones is as follows:

    Shortcut (Windows / Linux) Shortcut (macOS) Action
    Ctrl-‘ Cmd-‘ “toggleBlockquote”
    Ctrl-B Cmd-B “toggleBold”
    Ctrl-E Cmd-E “cleanBlock”
    Ctrl-H Cmd-H “toggleHeadingSmaller”
    Ctrl-I Cmd-I “toggleItalic”
    Ctrl-K Cmd-K “drawLink”
    Ctrl-L Cmd-L “toggleUnorderedList”
    Ctrl-P Cmd-P “togglePreview”
    Ctrl-Alt-C Cmd-Alt-C “toggleCodeBlock”
    Ctrl-Alt-I Cmd-Alt-I “drawImage”
    Ctrl-Alt-L Cmd-Alt-L “toggleOrderedList”
    Shift-Ctrl-H Shift-Cmd-H “toggleHeadingBigger”
    F9 F9 “toggleSideBySide”
    F11 F11 “toggleFullScreen”

    Licence and contribution

    A lot of people sent me the same question. My components (MarkdownEditor, DataTable, SVG Icon and others that you find on my GitHub) are freeware.

    I ask you to contribute to the project in one of the following ways:

    • sending your feedback
    • highlight bugs
    • ask for improvement
    • submit code and fixes
    • share the project
    • share my website PureSourceCode.com

    If you don’t know how to do it or you:

    • want to support this project
    • find very useful this project and it saves you a lot of time and work
    • like to sustain my work
    • want to pay my a beer
    • are using this component for commercial purpose and you want to set your conscience at rest and/or put a hand on one’s heart 😂

    then, you can buy one of the support licence I created. There are different prices. The amount is your decision. You find have a full list on PureSourceCode Shop

    The contribution gives you:

    • dedicate email support
    • priority access to the support
    • fast bug fix
    • receive preview and beta of the components
    • help to fix your code with Visual Studio Live Share

    Other Blazor components

    Component name Forum Description
    DataTable for Blazor Forum DataTable component for Blazor WebAssembly and Blazor Server
    Markdown editor for Blazor Forum This is a Markdown Editor for use in Blazor. It contains a live preview as well as an embeded help guide for users.
    Browser Detect for Blazor Forum Browser detect for Blazor WebAssembly and Blazor Server
    CodeSnipper for Blazor Forum Add code snippet in your Blazor pages for 196 programming languages with 243 styles
    Copy To Clipboard Forum Add a button to copy text in the clipbord
    SVG Icons and flags for Blazor Forum Library with a lot of SVG icons and SVG flags to use in your Razor pages
    Modal dialog for Blazor Forum Simple Modal Dialog for Blazor WebAssembly
    PSC.Extensions Forum A lot of functions for .NET5 in a NuGet package that you can download for free. We collected in this package functions for everyday work to help you with claim, strings, enums, date and time, expressions…
    Quill for Blazor Forum Quill Component is a custom reusable control that allows us to easily consume Quill and place multiple instances of it on a single page in our Blazor application
    Segment for Blazor Forum This is a Segment component for Blazor Web Assembly and Blazor Server
    Tabs for Blazor Forum This is a Tabs component for Blazor Web Assembly and Blazor Server
    WorldMap for Blazor Forum Show world maps with your data

    More examples and documentation


    Visit original content creator repository https://github.com/erossini/BlazorMarkdownEditor
  • skp-to-m3u

    skp-to-m3u

    An automated solution to turn skp files to m3u files for skipping over sections of a video while using something like VLC Media Player.

    Goal

    The “skp” file format, called “Skip”, is a file format used in conjunction with the open-source project VideoSkip.
    These files help denote sections of a video that wish to be skipped over.
    Skip files can be obtained from https://videoskip.herokuapp.com/exchange/.

    The “m3u” file format, aka the MP3 URL, is a file format that can easily be used to leverage the same capability as “skp” files. When using “m3u” files with VLC media player, these jumps in time to skip over timestamped sections can be achieved with #EXTVLCOPT headers.

    This automated tool provides the convenience of the community’s provided Skip files with the ease of use of VLC Media Player to achieve a great video experience.

    How to Use

    There are a variety of scripts here that all do the same thing.

    The files in this repository achieve the same thing, but are available for different platforms, like for PowerShell or Bash or Python, etc.

    Running the script requires parameters:

    • Path of source video file
    • Path of Skip file to convert

    If you do not include these when running the script, you will be prompted for them.

    Once the script is done, it will output a M3U file to the location of your video file.
    The M3U file must be in the same directory of your video file.

    Opening the M3U with VLC Media Player will produce the desired effect.

    It can look like:

    ./skp-to-m3u.ps1 -VideoFile "movie.mkv" -SKPFile "C:\Users\Test\Downloads\movie.skp"
    
    python skp-to-m3u.py "~/movie.mkv" "~/movie.skp"
    
    ./skp-to-m3u.sh "~/movie.mkv" "~/movie.skp"

    Technical Details

    Again, we’re just taking the information of the Skip file and translating it to a useable M3U file, nothing mind blowing like solving P=NP or creating a real random number generator.

    A Skip file has the timestamp in the following pattern:

    0:23:13.63 --> 0:23:44.84
    bad stuff

    For a M3U file, these timestamps are converted to seconds and the following is produced:

    #EXTVLCOPT:start-time=1
    #EXTVLCOPT:stop-time=1393
    movie.mkv
    #EXTVLCOPT:start-time=1424
    #EXTVLCOPT:stop-time=10822
    movie.mkv

    It’s a little more verbose, but you get the idea. The first section plays to a point and the second section picks up a little further ahead, skipping the bad stuff.

    Visit original content creator repository
    https://github.com/ivan-the-terrible/skp-to-m3u

  • abap-openapi

    ABAP OpenAPI Client & Server Generator

    ABAP OpenAPI is an OpenAPI generator tool designed to create API clients, ICF server handlers, and ICF server implementation stubs from OpenAPI documents.

    Generate

    It is possible to generate the objects using different processes:

    • Generate via our web client
    • Generate via command line (NodeJS)
    • Generate via ABAP

    Features

    Feature
    OpenAPI File Types JSON
    OpenAPI Versions v2*, v3
    ABAP Versions v702 and up
    Object Creation one self-contained global class & interface per OpenAPI definition

    * OpenAPI v2 is currently only capable by converting the v2 file to a v3 file. This can be done manually using the Swagger Editor, or programmatically using Swagger Converter

    NOTE: generated code currently uses ZCL_OAPI_JSON, suggest copying the implementation to a local class in the generated global class

    Use Cases

    API Creator

    • Write the OpenAPI document for your API so that you can generate the ICF handler and Server Implementation boilerplate
    • Use the OpenAPI document to create automatic documentation for your API

    API User

    • Use any OpenAPI document to create the client class to consume external APIs

    Building/Developing

    Prerequisites

    NodeJS 16+

    Setup

    • clone this repository
    • run npm install

    Testing

    Unit Tests: npm test
    Intergration Tests: npm run integration_test

    You can try out the generation using Swagger’s Petstore Example:

    • Just run npm run petstore
    • The output files will be generated in ./test_v1/generated/

    Example

    #!/usr/bin/env bash
    
    rm -rf abap-openapi
    git clone --depth=1 https://github.com/abap-openapi/abap-openapi
    rm -rf abap-openapi/.git
    cd abap-openapi
    npm ci
    npm run transpile
    rm ../src/api/*.abap
    node test_v2/index.mjs <filename> ../src/api <name>

    Visit original content creator repository
    https://github.com/abap-openapi/abap-openapi

  • gitpersona

    gitpersona

    We wear many hats from day to day. GitPersona manages them all.

    What?

    This utility allows you to choose which identity you want to use when cloning a new repo to your PC. If you work for multiple organizations, or have personal/organization projects, this should come in handy.

    How?

    We wrap a command around Git. When clone is used, we run our utility first. Then once the repo is clone, these commands are automatically executed:

    git config user.name "One of you identities"
    git config user.email "oneemail@identity.example"

    What you need?

    Python 3 and the packages

    • PyYAML

    • PtPython

    • GitPython

    To install them run:

     pip3 install gitpython pyyaml ptpython

    How to use:

    Clone this repo:

    git clone https://github.com/andersonpem/gitpersona.git $HOME/.gitpersona

    Run this to add it to your path and have a git wrapper:

    # If you use Bash
    echo "source $HOME/.gitpersona/gitwrapper" >> $HOME/.bashrc
    # If you use ZSH
    echo "source $HOME/.gitpersona/gitwrapper" >> $HOME/.zshrc
    
    # If yo use Windows, you should be ashamed of yourself :P
    # Run this to refresh your terminal's rc:
    source $HOME/.bashrc # or for ZSH:
    source $HOME/.zshrc 

    Add your first identity:

    gitpersona-manager add "Andy" "andy@example.com"
    # Gitpersona will return:
    Identity 'Andy' added.

    Now clone a repo and you’ll be asked for an identity. The identity selection has autocomplete with tab.

    Visit original content creator repository
    https://github.com/andersonpem/gitpersona

  • BankNoteCheck

    Machine Learning END-TO-END Project Using Flask API, Docker & AWS to Classify Bank 💵 Counterfeit VS Non-Counterfeit Notes 💵

    🎦 Demo 👇

    Demo

    📍 Production URL for availing this app ➡️ Fake Note Detection

    Aim of this Project

    • This project aims to classify Counterfeit and Non-Counterfeit Bank Notes using Machine Learning techniques.
    • This project was also Containerized Using Docker.
    • Deployment was done using Flask API on an AWS EC2 instance.

    Datasets:-

    • Data were extracted from images that were taken from genuine and forged banknote-like specimens. For digitization, an industrial camera usually used for print inspection was used. The final images have 400x 400 pixels. Due to the object lens and distance to the investigated object gray-scale pictures with a resolution of about 660 dpi were gained. Wavelet Transform tool were used to extract features from images.
    • Source ➡️ Kaggle

    📝 HLD(High Level Design)

    • Features provided in the dataset are:-
      • Variance
      • Skewness
      • Curtosis
      • Entropy
    • EDA ➡️ After performing EDA on this dataset, it was easy to conclude that the features ➡️ Variance and Skewness are the most important features which will help us create a clear distinction between fake and genuine notes. For detailed analysis done via EDA, please refer the BankNoteAuth.ipynb file.
    • Train-Test split: The dataset was split into 70(train):30(test) ratio. No cross-validation set was created since the dataset is very small. It contains only 1372 data points.
    • Data Pre-processing ➡️ The features were simply Standardized.
    • Choosing the Machine Learning models ➡️ 3 different ML models were used for analysis and all 3 gave very good results.
    • Scoring used ➡️ was f1-score. Below table displays all 3 models and the f1-scores obtained:- Table
    • Support Vector Machine resulted the highest f1-score of 1.0.

    Deployment using Flask API and AWS Containerization using Docker

    • A simple web-app has been built using this model (as shown in the Demo) and Flask API and Containerized using Docker.
    • This web-app has also been Deployed into Production using Flask API on an AWS EC2 instance.
    • Please refer my documentation Flask_Docker_AWS_Procedures to see how I deployed and containerized.
    • Using this web-app, you can enter variance,skewness,curtosis and entropy features extracted by you and the app will tell you if the Note is fake or genuine.

    📁 Libraries Used

    🖍️ matplotlib 🖍️ seaborn 🖍️ numpy 🖍️ pandas 🖍️ prettytable 🖍️ Flask

    🛠️ 🧰 Tools and Softwares Used

    • Jupyter Notebook
    • Sublime Text
    • Docker
    • AWS
    Visit original content creator repository https://github.com/toushalipal6991/BankNoteCheck
  • Vitis_with_100Gbps_TCP-IP

    EasyNet: 100 Gbps TCP/IP Network Stack for HLS

    This repository provides TCP/IP network support at 100 Gbit/s in Vitis-HLS and provides several examples to demonstrate the usage.

    Architecture Overview

    This repository creates designs with three Vitis kernels: cmac kernel, network kernel and user kernel. The cmac kernel and the network kernel serve as a common infrastructure for network functionality while the user kernel can be customized for each application.

    CMAC Kernel

    The cmac kernel contains an UltraScale+ Integrated 100G Ethernet Subsystem. It is connected to the GT pins exposed by the Vitis shell and it runs at 100G Ethernet Subsystem clock, i.e.,322 MHz. It also exposes two 512-bit AXI4-Stream interfaces to the network kernel for Tx and Rx network packets. Internally the cmac kernel has CDC (clock domain crossing) logic to convert from network kernel clock to the 100G Ethernet Subsystem clock.

    Network Kernel

    The network kernel is a collection of HLS IP cores to provide TCP/IP network functionality. It can saturate 100 Gbps network bandwidth and it is clocked at 250 MHz. The kernel contains two 512-bit AXI4 interfaces to two memory banks, which serve as temporary buffers for Tx packet retransimission and Rx packet buffering respectively. The network kernel also exposes AXI4-Stream interfaces to the user kernel for openning and closing TCP/IP connection, sending and receiving network data. For a detailed description of the interface, please see below. The TCP/IP stack also contains several compile time parameters that can be tuned for performance benifit or resource saving for a specific application. For a more detailed description, please see how to configure TCP/IP stack below.

    User Kernel

    The user kernel contains AXI4-Stream interfaces to the network kernel and other interfaces that can be customized for each application. It is clocked at the same frequency as the network kernel. The user kernel can be developed in Vitis supported languages: RTL, C/C++ and OpenCL, and it should satisfy the requirement of the Vitis application acceleration flow. This repository contains several examples written in RTL or C++ to illustrate how the user kernel could interact with the network kernel and to benchmark network statistic.

    User-Network Kernel Interface

    The AXI4-Stream interfaces between the network kernel and the user kernel is shown below. The interfaces can be divided into two paths: Rx and Tx. The structure of the interfaces can be found in kernel/common/include/toe.hpp.

    On the RX path, the user kernel can put a TCP port into listening state through the listenPortReq interface and is notified about the port state change on the listenPortRsp interface. A Rx control handshake is required between the user and the network kernel before receving the payload. Through the notification interface, the user kernel is informed either about data available in the Rx Buffer or connection termination by the other end. To retrieve data from the Rx Buffer, the user kernel issues a request to the rxDataReq interface containing the session ID and length to be retrieved. This request is answered by the network kernel by providing the stream of data on the rxDataRsp interface.

    The user kernel can open active connections through the openConReq interface providing the IP address and TCP port of the destination. Through the openConRsp, it will then either receive the session ID of the new connection or be notified that the connection could not be established. The user kernel can close a connection by issuing the session ID to the closeConReq interface. To transfer data over an existing connection, a Tx control handshake is required before each payload transfer. The user kernel has to first provide the session ID and the length to the txDataReq interface. For each requested transfer, the TCP module will return a response on the txDataRsp interface indicating potential errors and the remaining buffer space for that connection. If the txDataRsp doesn’t return any error, the user kernel can send the payload to the txData interface. Notice that for each transfer, it should not exceed the maximum segement size.

    How to Achieve 100 Gbps Tx and Rx Rate

    Though the network kernel is capable of processing network packets at network rate, to actually achieve 100 Gbps rate at the user kernel, it requires a careful design with proper interaction with the network kernel and a proper tuning of the TCP/IP stack. Here we list three suggestions in order to achieve 100 Gbps at application level.

    (1) Pipeline Control Handshake and Payload Transfer

    For each Rx and Tx packet transfer, a control handshake between the user kernel and the network kernel is required before the actual payload receiving or transmitting. One straight forward way is to sequentially perform this “control handshake – payload transfer” for each transaction. However, due to complex logic control and registering in the TCP/IP stack, this control handshake process can take from 10 to 30 cycels. Considering the fact that it only takes 22 cycles for a payload transfer of 1408 bytes (64 bytes per cycle), the payload transfer process would be stalled for a substantial portion of time for each transaction. Therefore, in order to saturate the line rate, the control handshake and payload transfer for every consequtive transaction should be pipelined. Figure below shows example waveforms of the valid signal of Tx interfaces with and without pipelining between each transaction.

    (2) Send Packets With Size of Multiple of 64 Bytes

    During Tx process, the payload are buffered in global memory for retransmission in case of packet loss. This requires memory bandwidth of 100 Gbps if we want to saturate the network bandwidth. However, the memory access partern affects the memory bandwidth and especially with the Vitis shell, memory accesses with addresses not aligned to 64 byte would significantly decrease the memory bandwidth. In the case of sequential accesses with all unaligned memory addresses, the memory bandwidth is about only 25 Gbps, limiting the Tx rate. Therefore, it recommended to avoid unaligned memory access whenever possible and this can be achieved by sending packets with size of multiple of 64 bytes.

    (3) Concurrent Connections and Large Maximum Transfer Unit (MTU)

    To achieve 100 Gbps at the application level, it requires that both end points of the communication can work at network rate. In the case of communicating between an FPGA and a CPU, it requires proper tunning on the CPU side to meet the network rate. First, concurrent connections should be establised and pinned on different threads. Second, large MTU (e.g., 4096 Bytes) should be set to reduce the overhead of packet parsing.

    Performance Benchmark

    For performance benchmark in terms of throughput and open connection time, please see here.

    Clone the Repository

    Git Clone

    git clone	
    git submodule update --init --recursive
    

    Configure TCP Stack

    Setup the TCP/IP stack HLS IPs:

    mkdir build
    cd build
    cmake .. -DFDEV_NAME=u280 -DTCP_STACK_EN=1
    make ip
    

    TCP/IP stack options:

    Name Values Desription
    FNS_TCP_STACK_MAX_SESSIONS Integer Maximum number of session supported by the stack. Each session requires a 64 KB Tx and Rx buffer in off-chip memory and state tables using on-chip memory. The choice of this parameter is a trade-off between maximum supported session count and resource usage. ; Default: 1000
    FNS_TCP_STACK_RX_DDR_BYPASS_EN <0,1> Bypassing Rx packets buffering. If user application can consume Rx packets at line-rate, setting this parameter allows the network kernel forward packets directly to the user kernel, which reduces global memory usage and latency. ; Default: 1
    FNS_TCP_STACK_WINDOW_SCALING_EN <0,1> Enable TCP window scaling; Default: 1

    Create Design

    The following example command will synthesis and implement the design with selected user kernel. The generated XCLBIN resides in folder build_dir.hw.xilinx_u280_xdma_201920_3. The generated host executable resides in folder host.

    cd ../
    make all TARGET=hw DEVICE=/opt/xilinx/platforms/xilinx_u280_xdma_201920_3/xilinx_u280_xdma_201920_3.xpfm USER_KRNL=iperf_krnl USER_KRNL_MODE=rtl NETH=4
    
    • DEVICE Alveo development target platform
    • USER_KRNL Name of the user kernel
    • USER_KRNL_MODE If the user kernel is a rtl kernel, rtl mode should be specified. If the user kernel is a C/C++ kernel, then hls mode should be specified.

    Kernel options:

    USER_KRNL USER_KRNL_MODE Desription
    iperf_krnl rtl Iperf kernel contains some HLS IPs and a rtl wrapper. It can be used to benchmark netowrk bandwidth acting as iperf2 client. Usage: ./host XCLBIN_FILE [Server IP address in format 10.1.212.121] [#Connection] [Seconds]. The default port number of iperf2 is 5001.
    scatter_krnl rtl Scatter kernel contains some HLS IPs and a rtl wrapper. It scatters packets through serveral connections. Usage: ./host XCLBIN_FILE [IP address in format 10.1.212.121] [Base Port] [#Connection] [#Tx Pkg]. Kernel tries to open connections with different port numbers with incremental offset by the Base Port.
    hls_send_krnl hls This kernel is a C kernel working in the VITIS HLS flow. It contains simple examples in C to open connection, send data through the connection. Usage: ./host XCLBIN_FILE [#Tx Pkt] [IP address in format: 10.1.212.121] [Port]
    hls_recv_krnl hls This kernel is a C kernel working in the VITIS HLS flow. It contains simple examples in C to listen on port and receive data from connection established with that port. Usage: ./host XCLBIN_FILE [#RxByte] [Port]

    Repository structure

    ├── fpga-network-stack
    ├── scripts
    ├── kernel
    │   └── cmac_krnl
    │   └── network_krnl
    │   └── user_krnl
    |		└── iperf_krnl
    |		└── scatter_krnl
    |		└── hls_send_krnl
    |		└── hls_recv_krnl
    ├── host
    |	└── iperf_krnl
    |	└── scatter_krnl
    |	└── hls_send_krnl
    |	└── hls_recv_krnl
    ├── common
    ├── img
    
    • fpga-network-stack: this folder contains the HLS code for 100 Gbps TCP/IP stack
    • scripts: this folder contains scripts to pack each kernel and to connect cmac kernel with GT pins
    • kernel: this folder contains the rtl/hls code of cmac kernel, network kernel and user kernel. User kernel can be configured to one of the example kernels
    • host: this folder contains the host code of each user kernel
    • img: this folder contains images
    • common: this folder contains neccessary libraries for running the vitis kernel

    Support

    Tools

    Vitis XRT
    2022.1 2.13.466

    Alveo Cards

    Alveo Development Target Platform(s)
    U280 xilinx_u280_xdma_201920_3
    U250 xilinx_u250_gen3x16_xdma_3_1_202020_1
    U50 xilinx_u50_gen3x16_xdma_5_202210_1
    U55C xilinx_u55c_gen3x16_xdma_3_202210_1

    Requirements

    In order to generate this design you will need a valid UltraScale+ Integrated 100G Ethernet Subsystem license set up in Vivado.

    Acknowledgement

    We would like to thank David Sidler for developing the prototype of 100 Gbps TCP/IP stack and Mario Daniel Ruiz Noguera for helpful discussion. We also thank Xilinx for generous donations of software and hardware to build the Xilinx Adaptive Compute Cluster (XACC) at ETH Zurich.

    Publication

    If you use EasyNet, cite us :
    @INPROCEEDINGS {easynet,
        author = {Z. He and D. Korolija and G. Alonso},
        booktitle = {2021 31st International Conference on Field-Programmable Logic and Applications (FPL)},
        title = {EasyNet: 100 Gbps Network for HLS},
        year = {2021},
        pages = {197-203},
        doi = {10.1109/FPL53798.2021.00040},
        url = {https://doi.ieeecomputersociety.org/10.1109/FPL53798.2021.00040},
        publisher = {IEEE Computer Society},
        address = {Los Alamitos, CA, USA},
        month = {sep}
    }
    Visit original content creator repository https://github.com/fpgasystems/Vitis_with_100Gbps_TCP-IP
  • codacy-sonar-csharp

    Codacy Badge Build Status

    Codacy SonarC#

    This is the docker engine we use at Codacy to run SonarC# developed by SonarSource.

    You can also create a docker to integrate the tool and language of your choice! Check the Docs section for more information.

    Local Development

    Requirements:

    • unzip
    • xmllint
      • on ubuntu: apt-get install libxml2-utils
      • on alpine: apk add libxml2-utils
    • dotnet-sdk-6.0 – “The .NET Core SDK”
      • on archlinux: the above package also installs dotnet-runtime, dotnet-host and dotnet-targeting-pack) – the .NET Core SDK

    IDE

    This seems to be more or less working in vscode, install the “C# for Visual Studio Code (powered by OmniSharp)” extension and before opening the project in it do make configure.

    Commands

    • make configure – runs dotnet restore which downloads all the required libraries for the projects to work.
    • make build – compiles the Analyzer project.
    • make build-docs – compiles the DocsGenerator project.
    • make build-all – compiles both the Analyzer and DocsGenerator projects.
    • make documentation – downloads upstream rules for the sonar version we defined in Analyzer.csproj, extracts the rules for that version and runs the DocsGenerator application.

    See other useful targets inside the Makefile.

    Usage

    Publish the docker image locally

    docker build -t codacy-sonar-csharp:local .

    Run the docker locally

    docker run --user=docker --rm -v <PATH-TO-CODE>:/src:ro -v <PATH-TO>/.codacyrc:/.codacyrc:ro codacy-sonar-csharp:local

    Enter inside the docker image

    docker run --user=docker --rm -v <PATH-TO-CODE>:/src:ro -v <PATH-TO>/.codacyrc:/.codacyrc:ro -it --entrypoint /bin/sh codacy-sonar-csharp:local

    Make sure all the volumes mounted have the right permissions for user docker

    Tool configuration file

    Currently, to use your own configuration file, you must add a SonarLint.xml xml file with an AnalysisInput structure inside.

    Example:

        <?xml version="1.0" encoding="UTF-8"?>
        <AnalysisInput>
          <Rules>
            <Rule>
              <Key>S103</Key>
              <Parameters>
                <Parameter>
                  <Key>maximumLineLength</Key>  
                  <Value>24</Value>  
                </Parameter>
              </Parameters>
            </Rule>
          </Rules>
        </AnalysisInput>
    

    Docs

    Tool Developer Guide

    Tool Developer Guide – Using Scala

    Test

    We use the codacy-plugins-test to test our external tools integration. You can follow the instructions there to make sure your tool is working as expected.

    What is Codacy?

    Codacy is an Automated Code Review Tool that monitors your technical debt, helps you improve your code quality, teaches best practices to your developers, and helps you save time in Code Reviews.

    Among Codacy’s features:

    • Identify new Static Analysis issues
    • Commit and Pull Request Analysis with GitHub, BitBucket/Stash, GitLab (and also direct git repositories)
    • Auto-comments on Commits and Pull Requests
    • Integrations with Slack, HipChat, Jira, YouTrack
    • Track issues in Code Style, Security, Error Proneness, Performance, Unused Code and other categories

    Codacy also helps keep track of Code Coverage, Code Duplication, and Code Complexity.

    Codacy supports PHP, Python, Ruby, Java, JavaScript, and Scala, among others.

    Free for Open Source

    Codacy is free for Open Source projects.

    Visit original content creator repository https://github.com/codacy/codacy-sonar-csharp
  • majifix-jurisdiction

    majifix-jurisdiction

    Build Status Dependencies Status Coverage Status GitHub License Deploy to Heroku

    Commitizen Friendly code style: prettier Code Style npm version

    A representation of an entity (e.g municipal, local government etc) responsible for addressing citizen(or customer) service request(issue).

    Requirements

    Installation

    npm install @codetanzania/majifix-jurisdiction --save

    Usage

    import { connect } from '@lykmapipo/mongoose-common';
    import { Jurisdiction, start } from '@codetanzania/majifix-jurisdiction';
    
    // connect to mongodb
    connect(process.env.MONGODB_URI, error => { ... });
    
    // fire http server
    start(error => { ... });

    Testing

    • Clone this repository

    • Install all development dependencies

    npm install
    • Run example
    npm run dev
    • Then run test
    npm test

    Contribute

    It will be nice, if you open an issue first so that we can know what is going on, then, fork this repo and push in your ideas. Do not forget to add a bit of test(s) of what value you adding.

    References

    Licence

    The MIT License (MIT)

    Copyright (c) CodeTanzania & Contributors

    Permission is hereby granted, free of charge, to any person obtaining a copy of this software and associated documentation files (the “Software”), to deal in the Software without restriction, including without limitation the rights to use, copy, modify, merge, publish, distribute, sublicense, and/or sell copies of the Software, and to permit persons to whom the Software is furnished to do so, subject to the following conditions:

    The above copyright notice and this permission notice shall be included in all copies or substantial portions of the Software.

    THE SOFTWARE IS PROVIDED “AS IS”, WITHOUT WARRANTY OF ANY KIND, EXPRESS OR IMPLIED, INCLUDING BUT NOT LIMITED TO THE WARRANTIES OF MERCHANTABILITY, FITNESS FOR A PARTICULAR PURPOSE AND NONINFRINGEMENT. IN NO EVENT SHALL THE AUTHORS OR COPYRIGHT HOLDERS BE LIABLE FOR ANY CLAIM, DAMAGES OR OTHER LIABILITY, WHETHER IN AN ACTION OF CONTRACT, TORT OR OTHERWISE, ARISING FROM, OUT OF OR IN CONNECTION WITH THE SOFTWARE OR THE USE OR OTHER DEALINGS IN THE SOFTWARE.

    Visit original content creator repository https://github.com/CodeTanzania/majifix-jurisdiction
  • gen-ui-go

    Contributors Forks Stargazers Issues GPL License


    Logo

    gen-ui-go

    Generative UI in Golang, based on HTMX and Templ, is useful in Multi-Agent Systems.
    Report Bug · Request Feature

    🖌Generative UI in Golang, based on HTMX and Templ, is useful in Multi-Agent Systems.

    🌟 Reasons to Choose gen-ui-go

    🌐 Continuously Updated UI Component Library: Our UI component library is constantly expanding, offering the latest design elements and features to help developers keep their applications modern while maintaining high performance and elegance.

    🖥️ Full Backend Rendering: gen-ui-go implements full backend rendering, ensuring data security and privacy. This makes it particularly suitable for scenarios that require a high degree of data control and customized rendering logic.

    🤖 Multi-Agent Planning Support: gen-ui-go supports multi-agent systems, allowing different agents to participate in UI planning and decision-making processes, providing robust support for complex interactions and automated workflows.

    🔄 Interactivity in Semi-Automatic Workflows: In semi-automatic workflows, gen-ui-go offers the capability for real-time interaction, allowing users to dynamically adjust and optimize during the running process, thereby improving efficiency and responsiveness.

    🔧 Suitable for Dynamic Environments: Whether it’s a fast-paced agile development environment or a finely controlled production environment, gen-ui-go provides the tools and flexibility needed to adapt to various development requirements.

    Intro

    Updates

    Timeline

    Card

    Conversation

    Audio/Image/Video

    Button

    List

    Textarea

    🏁 Getting Started

    To add the gen-ui-go to your Go project, use the following command:

    To register more components as examples:

    
    templ Button(text string) {
        <button class="button" onclick="alert('Clicked!')">{ text }</button>
    }
    
    func init(){
        RegisterExample("/button", Button("Click Me!"))
    }
    
    templ generate


    Roadmap

    • Basic feature
    • Modern CSS like bulma
    • Registry Example
    • Registry with Schema
    • More components

    See the open issues for a full list of proposed features (and known issues).

    (back to top)

    Contributing

    Contributions are what make the open source community such an amazing place to learn, inspire, and create. Any contributions you make are greatly appreciated.

    If you have a suggestion that would make this better, please fork the repo and create a pull request. You can also simply open an issue with the tag “enhancement”. Don’t forget to give the project a star! Thanks again!

    1. Fork the Project
    2. Create your Feature Branch (git checkout -b feature/AmazingFeature)
    3. Commit your Changes (git commit -m 'Add some AmazingFeature')
    4. Push to the Branch (git push origin feature/AmazingFeature)
    5. Open a Pull Request

    (back to top)

    License

    Distributed under the GPLv3 License. See LICENSE for more information.

    (back to top)

    Contact

    RealAlexandreAI – @RealAlexandreAI

    Project Link: https://github.com/RealAlexandreAI/gen-ui-go

    (back to top)

    Visit original content creator repository https://github.com/RealAlexandreAI/gen-ui-go
  • netconf

    Description

    • Package netconf/netconf implements basic (low level) netconf functionality. And provides a few common xml examples.
    • Package netconf/comware implements high level vendor specific functionality (HPE Comware7).
    • Package netcong/junos implements high level vendor specific functionality (Juniper JunOS).

    Examples

    See examples in following directories:

    • netconf/examples
    • comware/examples
    • junos/examples

    Сompatibility

    Partial tested with:

    • Juniper MX480 Junos: 17.4R1.16
    • Juniper MX80 Junos 15.1R6.7
    • Juniper QFX5200-32c-32q Junos: 15.1X53-D30.5
    • HPE FF 5130-24G-4SFP+ EI (JG932A) HPE Comware Software, Version 7.1.070, Releases: 3208P03/3208P08/3208P10/3506
    • HPE FF 5130-48G-4SFP+ EI (JG934A) HPE Comware Software, Version 7.1.070, Releases: 3208P03/3208P08/3208P10
    • HPE FF 5940 48SFP+ 6QSFP+ (JH395A) HPE Comware Software, Version 7.1.070, Release 2609

    Contribute

    Welcomes any kind of contribution, please follow the next steps:

    • Fork the project on github.com.
    • Create a new branch.
    • Commit changes to the new branch.
    • Send a pull request.

    Authors and Contributors

    Visit original content creator repository
    https://github.com/exsver/netconf