Author: yzowwrh2fkpj

  • EQUATE

    EQUATE

    This repository contains the EQUATE dataset, and the Q-REAS symbolic reasoning baseline[1].

    EQUATE

    EQUATE (Evaluating Quantitative Understanding Aptitude in Textual Entailment) is a new framework for evaluating quantitative reasoning ability in textual entailment.
    EQUATE consists of five NLI test sets featuring quantities. You can download EQUATE here. Three of these tests for quantitative reasoning feature language from real-world sources
    such as news articles and social media (RTE, NewsNLI Reddit), and two are controlled synthetic tests, evaluating model ability
    to reason with quantifiers and perform simple arithmetic (AWP, Stress Test).

    Test Set Source Size Classes Phenomena
    RTE-Quant RTE2-RTE4 166 2 Arithmetic, Ranges, Quantifiers
    NewsNLI CNN 968 2 Ordinals, Quantifiers, Arithmetic, Approximation, Magnitude, Ratios, Verbal
    RedditNLI Reddit 250 3 Range, Arithmetic, Approximation, Verbal
    StressTest AQuA-RAT 7500 3 Quantifiers
    AWPNLI Arithmetic Word Problems 722 2 Arithmetic

    Models reporting performance on any NLI dataset can additionally evaluate on the EQUATE benchmark,
    to demonstrate competence at quantitative reasoning.

    Q-Reas

    We also provide a baseline quantitative reasoner Q-Reas. Q-Reas manipulates quantity representations symbolically to make entailment decisions.
    We hope this provides a framework for the development of hybrid neuro-symbolic architectures to combine the strengths of symbolic reasoners and
    neural models.

    Q-Reas has five modules:

    1. Quantity Segmenter: Extracts quantity mentions
    2. Quantity Parser: Parses mentions into semantic representations called NUMSETS
    3. Quantity Pruner: Identifies compatible NUMSET pairs
    4. ILP Equation Generator: Composes compatible NUMSETS to form plausible equation trees
    5. Global Reasoner: Constructs justifications for each quantity in the hypothesis,
      analyzes them to determine entailment labels

    Qreas

    How to Run Q-Reas

    Running Q-Reas on EQUATE

    You can run Q-Reas on EQUATE with the following command:

    python global_reasoner.py -DATASET_NAME (rte, newsnli, reddit, awp, stresstest)

    Q-Reas consists of the following components:

    1. Quantity Segmenter: quantity_segmenter.py (uses utils_segmenter.py)
    2. Quantity Parser: numerical_parser.py (uses utils_parser.py)
    3. Quantity Pruner: numset_pruner.py
    4. ILP Equation Generator: ilp.py
    5. Global Reasoner: global_reasoner.py (uses utils_reasoner.py, scorer.py, eval.py)

    and utilizes the following data structures:

    1. numset.py: Defines semantic representation for a quantity
    2. parsed_numsets.py: Stores extracted NUMSETS for a premise-hypothesis pair
    3. compatible_numsets.py: Stores compatible pairs of NUMSETS

    References

    Please cite [1] if our work influences your research.

    EQUATE: A Benchmark Evaluation Framework for Quantitative Reasoning in Natural Language Inference (CoNLL 2019)

    [1] A. Ravichander*, A. Naik*, C. Rose, E. Hovy EQUATE: A Benchmark Evaluation Framework for Quantitative Reasoning in Natural Language Inference

    @article{ravichander2019equate,
      title={EQUATE: A Benchmark Evaluation Framework for Quantitative Reasoning in Natural Language Inference},
      author={Ravichander, Abhilasha and Naik, Aakanksha and Rose, Carolyn and Hovy, Eduard},
      journal={arXiv preprint arXiv:1901.03735},
      year={2019}
    }
    

    Visit original content creator repository

  • confluent-tools

    Confluent Tools

    Build Status License

    Kafka, Zookeeper, and Confluent’s command-line tools in a docker image.

    Overview

    This is a docker image that provides the confluent platform tools. This can be utilized to run the Kafka, Zookeeper, or Confluent tools locally without having to install them. It can also be deployed alongside Kafka & Zookeeper so one can utilize the tools in a live setting. It’s also quite useful for running these tools on Windows machines.

    Getting Started

    Ensure you have Docker installed. Pull down the image:

    docker pull devshawn/confluent-tools

    Singleton mode

    If you just need to run a command locally and don’t need to keep the container running, you can execute commands without a background daemon container.

    docker run --net=host -it --entrypoint run devshawn/confluent-tools {cmd}

    For example, listing Kafka topics with local zookeeper running:

    docker run --net=host -it --entrypoint run devshawn/confluent-tools kafka-topics --list --zookeeper localhost:2181

    Daemon mode

    The container can be run in daemon mode and act as a running machine with the tools installed. Start the container:

    docker run -d --name confluent-tools --net=host devshawn/confluent-tools

    The container will now be running. We set the following properties:

    • -d: run container in daemon mode
    • –name: set the container name
    • –net=host: run container with access to localhost (i.e. kafka running locally)

    Execute Single Commands

    You can run single commands such as:

    docker exec -it confluent-tools {cmd}

    For example, listing Kafka topics with local zookeeper running:

    docker exec -it confluent-tools kafka-topics --list --zookeeper localhost:2181

    Executing Commands

    If you’re going to be running a lot of commands, it’s easier to run them from inside of the container. First, open a shell inside of the container:

    docker exec -it confluent-tools /bin/bash

    You’ll now see something such as:

    bash-4.4#

    From here, run commands as if they were on your local machine. For example, listing Kafka topics with a local zookeeper running:

    kafka-topics --list --zookeeper localhost:2181

    Ackowledgements

    This project was made to make utilizing the confluent tools easier on local machines. All credit to the Confluent team and many open source contributors. ❤️

    License

    This project is licensed under the Apache 2.0 license. Apache Kafka and Apache Zookeeper are licensed under the Apache 2.0 license as well. Any Confluent products or tools are licensed under the Confluent Community License.

    Visit original content creator repository
  • Multi-Speaker-Diarization

    Multi-Speaker-Diarization

    Automated Multi Speaker diarization API for meetings, calls, interviews, press-conference etc.

    DeepAffects Speaker diarization API tries to figure out “Who Speaks When”. It essentially splits audio clip into segments corresponding to a unique speaker.

    POST Request

    POST https://proxy.api.deepaffects.com/audio/generic/api/v2/async/diarize

    Sample Code

    Shell

    curl -X POST "https://proxy.api.deepaffects.com/audio/generic/api/v2/async/diarize?apikey=<API_KEY>&webhook=<WEBHOOK_URL>&request_id=<REQUEST_ID>" -H 'content-type: application/json' -d @data.json
    
    # contents of data.json
    {"content": "bytesEncodedAudioString", "sampleRate": 8000, "encoding": "FLAC", "languageCode": "en-US", "speakers": 2, "audioType": "callcenter"}

    Javascript

    var DeepAffects = require("deep-affects");
    var defaultClient = DeepAffects.ApiClient.instance;
    
    // Configure API key authorization: UserSecurity
    var UserSecurity = defaultClient.authentications["UserSecurity"];
    UserSecurity.apiKey = "<API_KEY>";
    
    var apiInstance = new DeepAffects.DiarizeApiV2();
    
    var body = DeepAffects.DiarizeAudio.fromFile("/path/to/file"); // DiarizeAudio | Audio object that needs to be diarized.
    
    var callback = function(error, data, response) {
      if (error) {
        console.error(error);
      } else {
        console.log("API called successfully. Returned data: " + data);
      }
    };
    
    webhook = "https://your/webhook/";
    // async request
    apiInstance.asyncDiarizeAudio(body, webhook, callback);

    Python

    import requests
    import base64
    
    url = "https://proxy.api.deepaffects.com/audio/generic/api/v2/async/diarize"
    
    querystring = {"apikey":"<API_KEY>", "webhook":"<WEBHOOK_URL>", "request_id":"<OPTIONAL_REQUEST_ID>"}
    
    payload = {
        "encoding": "Wave",
        "languageCode": "en-US",
        "speakers": -1,
        "doVad": true
    }
    
    # The api accepts data either as a url or as base64 encoded content
    # passing payload as url:
    payload["url"] = "https://publicly-facing-url.wav"
    # alternatively, passing payload as content:
    with open(audio_file_name, 'rb') as fin:
        audio_content = fin.read()
    payload["content"] = base64.b64encode(audio_content).decode('utf-8')
    
    headers = {
        'Content-Type': "application/json",
    }
    
    response = requests.post(url, data=payload, headers=headers, params=querystring)
    
    print(response.text)

    Output

    # Sync:
    
    {
      "num_speakers": 2,
      "segments":[
            {
                "speaker_id": "speaker1",
                "start": 0,
                "end": 1
            }
        ]
    }
    
    # Async:
    
    {
    "request_id": "8bdd983a-c6bd-4159-982d-6a2471406d62",
    "api": "requested_api_name"
    }
    
    # Webhook:
    
    {
    "request_id": "8bdd983a-c6bd-4159-982d-6a2471406d62",
    "response": {
      "num_speakers": 2,
      "segments":[
            {
                "speaker_id": "speaker1",
                "start": 0,
                "end": 1
            }
        ]
      }
    }

    Body Parameters

    Parameter Type Description Notes
    encoding String Encoding of audio file like MP3, WAV etc.
    sampleRate Number Sample rate of the audio file.
    languageCode String Language spoken in the audio file. [default to ‘en-US’]
    content String base64 encoding of the audio file.
    speakers Number Number of speakers in the file (-1 for unknown speakers) [default to -1]
    audioType String Type of the audio based on number of speakers [default to callcenter]
    speakerIds List[String] Optional set of speakers to be identified from the call [default to []]
    doVad Bool Apply voice activity detection [default to False]

    audioType: can have two values 1) callcenter 2) meeting. We recommend using callcenter when there are two speakers expected to be identified and meeting when multiple speakers are expected.
    doVad: Default=False. This parameters is required if you want silence & noise segments removed from the diarization output.

    Query Parameters

    Parameter Type Description Notes
    api_key String The apikey Required for authentication inside all requests
    webhook String The webhook url at which the responses will be sent Required for async requests
    request_id Number An optional unique id to link async response with the original request Optional

    Output Parameters (Async)

    Parameter Type Description Notes
    request_id String The request id This defaults to the originally sent id or is generated by the api
    api String The api method which was called

    Output Parameters (Webhook)

    Parameter Type Description Notes
    request_id String The request id This defaults to the originally sent id or is generated by the api
    response Object The actual output of the diarization The Diarized object is defined below

    Diarized Object

    Parameter Type Description Notes
    num_speakers Number The number of speakers detected The number of speaker will be detected only when the request set speakers to -1
    segments List List of diarized segments The Diarized Segment is defined below

    Diarized Segment

    Parameter Type Description Notes
    speaker_id Number The speaker id for the corresponding audio segment
    start Number Start time of the audio segment in seconds
    end Number End time of the audio segment in seconds

    About

    DeepAffects is a speech analysis platform for Developers. We offer a number of speech analysis apis like, Speech Enhancement, Multi-Speaker Diarization, Emotion Recognition, Voice-prints, Conversation Metrics etc. For more information, checkout our developer portal

    Visit original content creator repository

  • 42-Cursus

    42-Cursus

    Projects from the 42 Cursus to date. Studies commenced 21 February 2022.

    Note regarding the following table:

    • CCR stands for Common Core Rank, it represents what stage you are at in your studies. To validate your studies you must complete Libft(CCR 0). Afterwards, there are 6 CCRs and 5 exams total (exam02-exam06). Each exam will advance you to the subsequent rank.

    Project CCR Summary Status
    Libft 0 This project is about coding a C library. It will contain a lot of general purpose functions your programs will rely upon. Complete
    Born2beroot 1 This document is a System Administration related exercise. Complete
    ft_printf 1 The goal of this project is pretty straightforward. You will recode printf(). You will mainly learn about using a variable number of arguments. Complete
    get_next_line 1 This project is about programming a function that returns a line read from a file descriptor. Complete
    minitalk 2 The purpose of this project is to code a small data exchange program using UNIX signals. Complete
    push_swap 2 This project will make you sort data on a stack, with a limited set of instructions, using the lowest possible number of actions. To succeed you’ll have to manipulate various types of algorithms and choose the most appropriate solution (out of many) for an optimised data sorting. Complete
    FdF 2 This project is about representing a landscape as a 3D object in which all surfaces are outlined in lines. Complete
    Philosophers 3 In this project, you will learn the basics of threading a process. You will see how to create threads and you will discover mutexes. Complete
    Minishell 3 Creating your own little bash shell. Complete
    CPP 00-04 4 Time to dive into Object Oriented Programming! Complete
    cub3d 4 This project is inspired by the world-famous eponymous 90’s game, which was the first FPS ever. It will enable you to explore ray-casting. Your goal will be to make a dynamic view inside a maze, in which you’ll have to find your way. Complete
    NetPractice 4 NetPractice is a general practical exercise to let you discover networking. Complete
    CPP 05-09 5 This module is designed to help you understand the containers in CPP. Complete
    Inception 5 This project aims to broaden your knowledge of system administration by using Docker. You will virtualize several Docker images, creating them in your new personal virtual machine. Complete
    ft_irc 5 Create your own IRC server in C++, fully compatible with an official client. Complete
    ft_transcendence 6 This project is about creating a website for the mighty Pong contest! Complete

    Skills
    • Rigor
    • Unix
    • Algorithms & AI
    • Network & system administration
    • Imperative programming
    • Graphics
    • Object-oriented programming
    • Web
    • Group & interpersonal

    Visit original content creator repository

  • GNNgraph

    The GNNgraph fork of ReadTheDocs tutorial

    This Prepre-pre-alpha GitHub template repository includes PLANNED Python library, GNNgraph.py with some basic Sphinx docs … this is mostly about LEARNING and enjoying learning by exploring a graph, which might be like a syllabus, except that it’s more convoluted, branching and tangled … it is about LEARNING in an autodiadactic hands on manner OR doing things the hard way before making them scale OR proceeding from first principles or from scratch OR taking it step-by-step but paying most attention to the assumptions, rather than narrowing the choices down on a multiple choice test.

    The GNNgraph project is about learning how to use data APIs and then wrangling data to be able to parse simple json, csv or minimally formatted txt files into a visual, navigable knowledge-graph.

    It’s all about the connections and the emergent patterns in data.

    Obviously, using reStructuredText to parse this documentation is a deliberate choice which is not just about relying upon the very simple, highly stable docutils codebase.

    We envision an annotatable, forkable knowledge-graph which would provide digraph visualization of related modeling approach for comparisons and analyis, as well as ready navigation directly to different executable Python snackable tutorials for learning about how different families of neural network model works … along with an annotated bibliography of related papers with code and data in the area.

    This repository itself began its life as a fork the ReadTheDocs Tutorial. The larger process of how Sphinx works and how forkable tutorial templates like this are built to be integrated with various version control system providers is itself very interesting to anyone exploring how knowledge can be version controlled then forked, shared, work with the universe of Git tools and part of social issues-driven discussion or even pair programming on a platform like GitHub or GitLab… and will be historically, long after after this project is operational.

    Visit original content creator repository

  • HDPCD

    Welcome to HDPCD Repository

    You can use this repository for preparing the Hortonworks Data Platform Certified Developer certification.
    The link for the certification is https://hortonworks.com/services/training/certification/exam-objectives/#hdpcd

    Following objectives are tested through this certification

    ## DATA INGESTION
    - Import data from a table in a relational database into HDFS
    - Import the results of a query from a relational database into HDFS
    - Import a table from a relational database into a new or existing Hive table
    - Insert or update data from HDFS into a table in a relational database
    - Given a Flume configuration file, start a Flume agent
    - Given a configured sink and source, configure a Flume memory channel with a specified capacity
    
    ## DATA TRANSFORMATION
    - Write and execute a Pig script
    - Load data into a Pig relation without a schema
    - Load data into a Pig relation with a schema
    - Load data from a Hive table into a Pig relation
    - Use Pig to transform data into a specified format
    - Transform data to match a given Hive schema
    - Group the data of one or more Pig relations
    - Use Pig to remove records with null values from a relation
    - Store the data from a Pig relation into a folder in HDFS
    - Store the data from a Pig relation into a Hive table
    - Sort the output of a Pig relation
    - Remove the duplicate tuples of a Pig relation
    - Specify the number of reduce tasks for a Pig MapReduce job
    - Join two datasets using Pig
    - Perform a replicated join using Pig
    - Run a Pig job using Tez
    - Within a Pig script, register a JAR file of User Defined Functions
    - Within a Pig script, define an alias for a User Defined Function
    - Within a Pig script, invoke a User Defined Function
    
    ## DATA ANALYSIS
    - Write and execute a Hive query
    - Define a Hive-managed table
    - Define a Hive external table
    - Define a partitioned Hive table
    - Define a bucketed Hive table
    - Define a Hive table from a select query
    - Define a Hive table that uses the ORCFile format
    - Create a new ORCFile table from the data in an existing non-ORCFile Hive table
    - Specify the storage format of a Hive table
    - Specify the delimiter of a Hive table
    - Load data into a Hive table from a local directory
    - Load data into a Hive table from an HDFS directory
    - Load data into a Hive table as the result of a query
    - Load a compressed data file into a Hive table
    - Update a row in a Hive table
    - Delete a row from a Hive table
    - Insert a new row into a Hive table
    - Join two Hive tables
    - Run a Hive query using Tez
    - Run a Hive query using vectorization
    - Output the execution plan for a Hive query
    - Use a subquery within a Hive query
    - Output data from a Hive query that is totally ordered across multiple reducers
    - Set a Hadoop or Hive configuration property from within a Hive query
    

    Hope you guys like it.
    You can visit my LinkedIn profile at https://www.linkedin.com/in/milindjagre/

    Visit original content creator repository

  • glidex

    glidex.forms (or just glidex)

    Google recommends Glide for simplifying the complexity of managing Android.Graphics.Bitmap within your apps (docs here).

    glidex.forms is small library we can use to improve Xamarin.Forms image performance on Android by taking a dependency on Glide. See my post on the topic here.

    Download from NuGet:

    glidex.forms
    NuGet

    Learn more on this episode of the Xamarin Show:

    Super Fast Image Loading for Android Apps with GlideX | The Xamarin Show

    If you have a “classic” Xamarin.Android app that is not Xamarin.Forms, it could be useful to use the Xamarin.Android.Glide NuGet package. If you want to improve the Xamarin binding for Glide, contribute to it on Github!

    How do I use glidex.forms?

    To set this library up in your existing project, merely:

    • Add the glidex.forms NuGet package
    • Add this one liner after your app’s Forms.Init call:
    Xamarin.Forms.Forms.Init (this, bundle);
    //This forces the custom renderers to be used
    Android.Glide.Forms.Init (this);
    LoadApplication (new App ());

    How do I know my app is using Glide?

    On first use, you may want to enable debug logging:

    Android.Glide.Forms.Init (this, debug: true);

    glidex.forms will print out log messages in your device log as to what is happening under the hood.

    If you want to customize how Glide is used in your app, currently your option is to implement your own IImageViewHandler. See the GlideExtensions class for details.

    Comparing Performance

    It turns out it is quite difficult to measure performance improvements specifically for images in Xamarin.Forms. Due to the asynchronous nature of how images load, I’ve yet to figure out good points at which to clock times via a Stopwatch.

    So instead, I found it much easier to measure memory usage. I wrote a quick class that runs a timer and calls the Android APIs to grab memory usage.

    Here is a table of peak memory used via the different sample pages I’ve written:

    NOTE: this was a past comparison with Xamarin.Forms 2.5.x

    Page Loaded by Peak Memory Usage
    GridPage Xamarin.Forms 268,387,112
    GridPage glidex.forms 16,484,584
    ViewCellPage Xamarin.Forms 94,412,136
    ViewCellPage glidex.forms 12,698,112
    ImageCellPage Xamarin.Forms 24,413,600
    ImageCellPage glidex.forms 9,977,272
    HugeImagePage Xamarin.Forms 267,309,792
    HugeImagePage glidex.forms 9,943,184

    NOTE: I believe these numbers are in bytes. I restarted the app (release mode) before recording the numbers for each page. Pages with ListViews I scrolled up and down a few times.

    Stock XF performance of images is poor due to the amount of Android.Graphics.Bitmap instances created on each page. Disabling the Glide library in the sample app causes “out of memory” errors to happen as images load. You will see empty white squares where this occurs and get console output.

    To try stock Xamarin.Forms behavior yourself, you can remove the references to glidex and glidex.forms in the glide.forms.sample project and comment out the Android.Glide.Forms.Init() line.

    Features

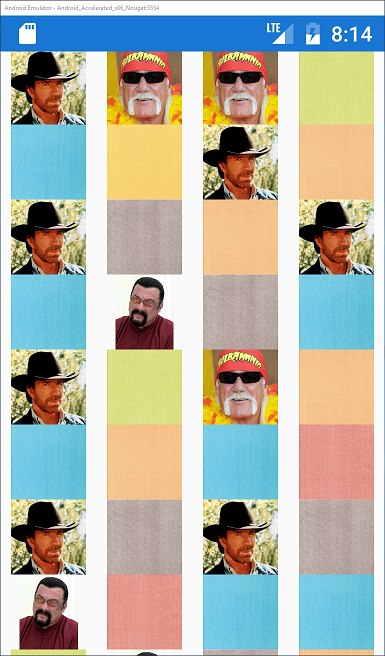
    In my samples, I tested the following types of images:

    • ImageSource.FromFile with a temp file
    • ImageSource.FromFile with AndroidResource
    • ImageSource.FromResource with EmbeddedResource
    • ImageSource.FromUri with web URLs
    • ImageSource.FromStream with AndroidAsset

    For example, the GridPage loads 400 images into a grid with a random combination of all of the above:

    GridPage

    Visit original content creator repository
  • slicingdice-javascript

    SlicingDice Official JavaScript Client (v2.1.0)

    Official JavaScript client for SlicingDice – Data Warehouse and Analytics Database as a Service.

    SlicingDice is a serverless, SQL & API-based, easy-to-use and really cost-effective alternative to Amazon Redshift and Google BigQuery.

    Build Status: CircleCI

    Code Quality: Codacy Badge

    Documentation

    If you are new to SlicingDice, check our quickstart guide and learn to use it in 15 minutes.

    Please refer to the SlicingDice official documentation for more information on how to create a database, how to insert data, how to make queries, how to create columns, SlicingDice restrictions and API details.

    Tests and Examples

    Whether you want to test the client installation or simply check more examples on how the client works, take a look at tests and examples directory.

    Installing

    In order to install the JavaScript client, you only need to use npm.

    npm install slicerjs

    Usage

    The following code snippet is an example of how to add and query data
    using the SlicingDice javascript client. We entry data informing
    user1@slicingdice.com has age 22 and then query the database for
    the number of users with age between 20 and 40 years old.
    If this is the first register ever entered into the system,
    the answer should be 1.

    var SlicingDice = require('slicerjs'); // only required for Node.js
    
    // Configure the client
    const client = new SlicingDice({
      masterKey: 'MASTER_API_KEY',
      writeKey: 'WRITE_API_KEY',
      readKey: 'READ_API_KEY'
    });
    
    // Inserting data
    const insertData = {
        "user1@slicingdice.com": {
            "age": 22
        },
        "auto-create": ["dimension", "column"]
    };
    client.insert(insertData);
    
    // Querying data
    const queryData = {
        "query-name": "users-between-20-and-40",
        "query": [
            {
                "age": {
                    "range": [
                        20,
                        40
                    ]
                }
            }
        ]
    };
    client.countEntity(queryData).then((resp) => {
        console.log(resp);
    }, (err) => {
        console.err(err);
    });

    Reference

    SlicingDice encapsulates logic for sending requests to the API. Its methods are thin layers around the API endpoints, so their parameters and return values are JSON-like Object objects with the same syntax as the API endpoints

    Constructor

    SlicingDice(apiKeys)

    • apiKeys (Object)API key to authenticate requests with the SlicingDice API.

    getDatabase()

    Get information about current database. This method corresponds to a GET request at /database.

    Request example

    let SlicingDice = require('slicerjs');
    
    const client = new SlicingDice({
      masterKey: 'MASTER_API_KEY'
    });
    
    client.getDatabase().then((resp) => {
        console.log(resp);
    }, (err) => {
        console.error(err);
    });

    Output example

    {
        "name": "Database 1",
        "description": "My first database",
        "dimensions": [
        	"default",
            "users"
        ],
        "updated-at": "2017-05-19T14:27:47.417415",
        "created-at": "2017-05-12T02:23:34.231418"
    }

    getColumns()

    Get all created columns, both active and inactive ones. This method corresponds to a GET request at /column.

    Request example

    let SlicingDice = require('slicerjs');
    
    const client = new SlicingDice({
        masterKey: 'MASTER_API_KEY'
    });
    
    client.getColumns().then((resp) => {
        console.log(resp);
    }, (err) => {
        console.error(err);
    });

    Output example

    {
        "active": [
            {
              "name": "Model",
              "api-name": "car-model",
              "description": "Car models from dealerships",
              "type": "string",
              "category": "general",
              "cardinality": "high",
              "storage": "latest-value"
            }
        ],
        "inactive": [
            {
              "name": "Year",
              "api-name": "car-year",
              "description": "Year of manufacture",
              "type": "integer",
              "category": "general",
              "storage": "latest-value"
            }
        ]
    }

    createColumn(jsonData)

    Create a new column. This method corresponds to a POST request at /column.

    Request example

    let SlicingDice = require('slicerjs');
    
    const client = new SlicingDice({
        masterKey: 'MASTER_API_KEY'
    });
    
    column = {
        "name": "Year",
        "api-name": "year",
        "type": "integer",
        "description": "Year of manufacturing",
        "storage": "latest-value"
    };
    
    client.createColumn(column).then((resp) => {
        console.log(resp);
    }, (err) => {
        console.error(err);
    });

    Output example

    {
        "status": "success",
        "api-name": "year"
    }

    insert(jsonData)

    Insert data to existing entities or create new entities, if necessary. This method corresponds to a POST request at /insert.

    Request example

    let SlicingDice = require('slicerjs');
    
    const client = new SlicingDice({
        masterKey: 'MASTER_API_KEY',
        writeKey: 'WRITE_API_KEY'
    });
    
    const insertData = {
        "user1@slicingdice.com": {
            "car-model": "Ford Ka",
            "year": 2016
        },
        "user2@slicingdice.com": {
            "car-model": "Honda Fit",
            "year": 2016
        },
        "user3@slicingdice.com": {
            "car-model": "Toyota Corolla",
            "year": 2010,
            "test-drives": [
                {
                    "value": "NY",
                    "date": "2016-08-17T13:23:47+00:00"
                }, {
                    "value": "NY",
                    "date": "2016-08-17T13:23:47+00:00"
                }, {
                    "value": "CA",
                    "date": "2016-04-05T10:20:30Z"
                }
            ]
        },
        "user4@slicingdice.com": {
            "car-model": "Ford Ka",
            "year": 2005,
            "test-drives": {
                "value": "NY",
                "date": "2016-08-17T13:23:47+00:00"
            }
        }
    };
    
    client.insert(insertData).then((resp) => {
       console.log(resp);
    }, (err) => {
        console.error(err);
    });

    Output example

    {
        "status": "success",
        "inserted-entities": 4,
        "inserted-columns": 10,
        "took": 0.023
    }

    existsEntity(ids, dimension = null)

    Verify which entities exist in a tabdimensionle (uses default dimension if not provided) given a list of entity IDs. This method corresponds to a POST request at /query/exists/entity.

    Request example

    let SlicingDice = require('slicerjs');
    
    const client = new SlicingDice({
        masterKey: 'MASTER_KEY',
        readKey: 'READ_KEY'
    });
    
    ids = [
            "user1@slicingdice.com",
            "user2@slicingdice.com",
            "user3@slicingdice.com"
    ];
    
    client.existsEntity(ids).then((resp) => {
        console.log(resp);
    }, (err) => {
        console.error(err);
    });

    Output example

    {
        "status": "success",
        "exists": [
            "user1@slicingdice.com",
            "user2@slicingdice.com"
        ],
        "not-exists": [
            "user3@slicingdice.com"
        ],
        "took": 0.103
    }

    countEntityTotal()

    Count the number of inserted entities in the whole database. This method corresponds to a POST request at /query/count/entity/total.

    Request example

    let SlicingDice = require('slicerjs');
    
    const client = new SlicingDice({
        masterKey: 'MASTER_KEY',
        readKey: 'READ_KEY'
    });
    
    client.countEntityTotal().then((resp) => {
        console.log(resp);
    }, (err) => {
        console.error(err);
    });

    Output example

    {
        "status": "success",
        "result": {
            "total": 42
        },
        "took": 0.103
    }

    countEntityTotal(dimensions)

    Count the total number of inserted entities in the given dimensions. This method corresponds to a POST request at /query/count/entity/total.

    Request example

    let SlicingDice = require('slicerjs');
    
    const client = new SlicingDice({
        masterKey: 'MASTER_KEY',
        readKey: 'READ_KEY'
    });
    
    const dimensions = ["default"];
    
    client.countEntityTotal(dimensions).then((resp) => {
        console.log(resp);
    }, (err) => {
        console.error(err);
    });

    Output example

    {
        "status": "success",
        "result": {
            "total": 42
        },
        "took": 0.103
    }

    countEntity(jsonData)

    Count the number of entities matching the given query. This method corresponds to a POST request at /query/count/entity.

    Request example

    let SlicingDice = require('slicerjs');
    
    const client = new SlicingDice({
        masterKey: 'MASTER_KEY',
        readKey: 'READ_KEY'
    });
    
    const query = [
        {
            "query-name": "corolla-or-fit",
            "query": [
                {
                    "car-model": {
                        "equals": "toyota corolla"
                    }
                },
                "or",
                {
                    "car-model": {
                        "equals": "honda fit"
                    }
                }
            ],
            "bypass-cache": false
        },
        {
            "query-name": "ford-ka",
            "query": [
                {
                    "car-model": {
                        "equals": "ford ka"
                    }
                }
            ],
            "bypass-cache": false
        }
    ];
    
    client.countEntity(query).then((resp) => {
        console.log(resp);
    }, (err) => {
        console.error(err);
    });

    Output example

    {
       "result":{
          "ford-ka":2,
          "corolla-or-fit":2
       },
       "took":0.083,
       "status":"success"
    }

    countEvent(jsonData)

    Count the number of occurrences for time-series events matching the given query. This method corresponds to a POST request at /query/count/event.

    Request example

    let SlicingDice = require('slicerjs');
    
    const client = new SlicingDice({
        masterKey: 'MASTER_KEY',
        readKey: 'READ_KEY'
    });
    
    const query = [
        {
            "query-name": "test-drives-in-ny",
            "query": [
                {
                    "test-drives": {
                        "equals": "NY",
                        "between": [
                            "2016-08-16T00:00:00Z",
                            "2016-08-18T00:00:00Z"
                        ]
                    }
                }
            ],
            "bypass-cache": true
        },
        {
            "query-name": "test-drives-in-ca",
            "query": [
                {
                    "test-drives": {
                        "equals": "CA",
                        "between": [
                            "2016-04-04T00:00:00Z",
                            "2016-04-06T00:00:00Z"
                        ]
                    }
                }
            ],
            "bypass-cache": true
        }
    ];
    
    client.countEvent(query).then((resp) => {
        console.log(resp);
    }, (err) => {
        console.error(err);
    });

    Output example

    {
       "result":{
          "test-drives-in-ny":3,
          "test-drives-in-ca":0
       },
       "took":0.063,
       "status":"success"
    }

    topValues(jsonData)

    Return the top values for entities matching the given query. This method corresponds to a POST request at /query/top_values.

    Request example

    let SlicingDice = require('slicerjs');
    
    const client = new SlicingDice({
        masterKey: 'MASTER_KEY',
        readKey: 'READ_KEY'
    });
    
    query = {
      "car-year": {
        "year": 2
      },
      "car models": {
        "car-model": 3
      }
    }
    
    client.topValues(query).then((resp) => {
        console.log(resp);
    }, (err) => {
        console.error(err);
    });

    Output example

    {
       "result":{
          "car models":{
             "car-model":[
                {
                   "quantity":2,
                   "value":"ford ka"
                },
                {
                   "quantity":1,
                   "value":"honda fit"
                },
                {
                   "quantity":1,
                   "value":"toyota corolla"
                }
             ]
          },
          "car-year":{
             "year":[
                {
                   "quantity":2,
                   "value":"2016"
                },
                {
                   "quantity":1,
                   "value":"2010"
                }
             ]
          }
       },
       "took":0.034,
       "status":"success"
    }

    aggregation(jsonData)

    Return the aggregation of all columns in the given query. This method corresponds to a POST request at /query/aggregation.

    Request example

    let SlicingDice = require('slicerjs');
    
    const client = new SlicingDice({
        masterKey: 'MASTER_KEY',
        readKey: 'READ_KEY'
    });
    
    query = {
      "query": [
        {
          "year": 2
        },
        {
          "car-model": 2,
          "equals": [
            "honda fit",
            "toyota corolla"
          ]
        }
      ]
    };
    
    client.aggregation(query).then((resp) => {
        console.log(resp);
    }, (err) => {
        console.error(err);
    });

    Output example

    {
       "result":{
          "year":[
             {
                "quantity":2,
                "value":"2016",
                "car-model":[
                   {
                      "quantity":1,
                      "value":"honda fit"
                   }
                ]
             },
             {
                "quantity":1,
                "value":"2005"
             }
          ]
       },
       "took":0.079,
       "status":"success"
    }

    getSavedQueries()

    Get all saved queries. This method corresponds to a GET request at /query/saved.

    Request example

    let SlicingDice = require('slicerjs');
    
    const client = new SlicingDice({
        masterKey: 'MASTER_KEY'
    });
    
    client.getSavedQueries().then((resp) => {
        console.log(resp);
    }, (err) => {
        console.error(err);
    });

    Output example

    {
        "status": "success",
        "saved-queries": [
            {
                "name": "users-in-ny-or-from-ca",
                "type": "count/entity",
                "query": [
                    {
                        "state": {
                            "equals": "NY"
                        }
                    },
                    "or",
                    {
                        "state-origin": {
                            "equals": "CA"
                        }
                    }
                ],
                "cache-period": 100
            }, {
                "name": "users-from-ca",
                "type": "count/entity",
                "query": [
                    {
                        "state": {
                            "equals": "NY"
                        }
                    }
                ],
                "cache-period": 60
            }
        ],
        "took": 0.103
    }

    createSavedQuery(jsonData)

    Create a saved query at SlicingDice. This method corresponds to a POST request at /query/saved.

    Request example

    let SlicingDice = require('slicerjs');
    
    const client = new SlicingDice({
        masterKey: 'MASTER_KEY'
    });
    
    query = {
      "name": "my-saved-query",
      "type": "count/entity",
      "query": [
        {
          "car-model": {
            "equals": "honda fit"
          }
        },
        "or",
        {
          "car-model": {
            "equals": "toyota corolla"
          }
        }
      ],
      "cache-period": 100
    }
    
    client.createSavedQuery(query).then((resp) => {
        console.log(resp);
    }, (err) => {
        console.error(err);
    });

    Output example

    {
       "took":0.053,
       "query":[
          {
             "car-model":{
                "equals":"honda fit"
             }
          },
          "or",
          {
             "car-model":{
                "equals":"toyota corolla"
             }
          }
       ],
       "name":"my-saved-query",
       "type":"count/entity",
       "cache-period":100,
       "status":"success"
    }

    updateSavedQuery(queryName, jsonData)

    Update an existing saved query at SlicingDice. This method corresponds to a PUT request at /query/saved/QUERY_NAME.

    Request example

    let SlicingDice = require('slicerjs');
    
    const client = new SlicingDice({
        masterKey: 'MASTER_KEY'
    });
    
    newQuery = {
      "type": "count/entity",
      "query": [
        {
          "car-model": {
            "equals": "ford ka"
          }
        },
        "or",
        {
          "car-model": {
            "equals": "toyota corolla"
          }
        }
      ],
      "cache-period": 100
    };
    
    client.updateSavedQuery("my-saved-query", newQuery).then((resp) => {
        console.log(resp);
    }, (err) => {
        console.error(err);
    });

    Output example

    {
       "took":0.037,
       "query":[
          {
             "car-model":{
                "equals":"ford ka"
             }
          },
          "or",
          {
             "car-model":{
                "equals":"toyota corolla"
             }
          }
       ],
       "type":"count/entity",
       "cache-period":100,
       "status":"success"
    }

    getSavedQuery(queryName)

    Executed a saved query at SlicingDice. This method corresponds to a GET request at /query/saved/QUERY_NAME.

    Request example

    let SlicingDice = require('slicerjs');
    
    const client = new SlicingDice({
        masterKey: 'MASTER_KEY',
        readKey: 'READ_KEY'
    });
    
    client.getSavedQuery("my-saved-query").then((resp) => {
        console.log(resp);
    }, (err) => {
        console.error(err);
    });

    Output example

    {
       "result":{
          "query":2
       },
       "took":0.035,
       "query":[
          {
             "car-model":{
                "equals":"honda fit"
             }
          },
          "or",
          {
             "car-model":{
                "equals":"toyota corolla"
             }
          }
       ],
       "type":"count/entity",
       "status":"success"
    }

    deleteSavedQuery(queryName)

    Delete a saved query at SlicingDice. This method corresponds to a DELETE request at /query/saved/QUERY_NAME.

    Request example

    let SlicingDice = require('slicerjs');
    
    const client = new SlicingDice({
        masterKey: 'MASTER_KEY'
    });
    
    client.deleteSavedQuery("my-saved-query").then((resp) => {
        console.log(resp);
    }, (err) => {
        console.error(err);
    });

    Output example

    {
       "took":0.029,
       "query":[
          {
             "car-model":{
                "equals":"honda fit"
             }
          },
          "or",
          {
             "car-model":{
                "equals":"toyota corolla"
             }
          }
       ],
       "type":"count/entity",
       "cache-period":100,
       "status":"success",
       "deleted-query":"my-saved-query"
    }

    result(jsonData)

    Retrieve inserted values for entities matching the given query. This method corresponds to a POST request at /data_extraction/result.

    Request example

    let SlicingDice = require('slicerjs');
    
    const client = new SlicingDice({
        masterKey: 'MASTER_KEY',
        readKey: 'READ_KEY'
    });
    
    query = {
      "query": [
        {
          "car-model": {
            "equals": "ford ka"
          }
        },
        "or",
        {
          "car-model": {
            "equals": "toyota corolla"
          }
        }
      ],
      "columns": ["car-model", "year"],
      "limit": 2
    };
    
    client.result(query).then((resp) => {
        console.log(resp);
    }, (err) => {
        console.error(err);
    });

    Output example

    {
       "took":0.113,
       "next-page":null,
       "data":{
          "customer5@mycustomer.com":{
             "year":"2005",
             "car-model":"ford ka"
          },
          "user1@slicingdice.com":{
             "year":"2016",
             "car-model":"ford ka"
          }
       },
       "page":1,
       "status":"success"
    }

    score(jsonData)

    Retrieve inserted values as well as their relevance for entities matching the given query. This method corresponds to a POST request at /data_extraction/score.

    Request example

    let SlicingDice = require('slicerjs');
    
    const client = new SlicingDice({
        masterKey: 'MASTER_KEY',
        readKey: 'READ_KEY'
    });
    
    query = {
      "query": [
        {
          "car-model": {
            "equals": "ford ka"
          }
        },
        "or",
        {
          "car-model": {
            "equals": "toyota corolla"
          }
        }
      ],
      "columns": ["car-model", "year"],
      "limit": 2
    };
    
    client.score(query).then((resp) => {
        console.log(resp);
    }, (err) => {
        console.error(err);
    });

    Output example

    {
       "took":0.063,
       "next-page":null,
       "data":{
          "user3@slicingdice.com":{
             "score":1,
             "year":"2010",
             "car-model":"toyota corolla"
          },
          "user2@slicingdice.com":{
             "score":1,
             "year":"2016",
             "car-model":"honda fit"
          }
       },
       "page":1,
       "status":"success"
    }

    sql(query)

    Retrieve inserted values using a SQL syntax. This method corresponds to a POST request at /query/sql.

    Query statement

    let SlicingDice = require('slicerjs');
    
    const client = new SlicingDice({
        masterKey: 'MASTER_KEY',
        readKey: 'READ_KEY'
    });
    
    query = "SELECT COUNT(*) FROM default WHERE age BETWEEN 0 AND 49";
    
    client.sql(query).then((resp) => {
        console.log(resp);
    }, (err) => {
        console.error(err);
    });

    Insert statement

    let SlicingDice = require('slicerjs');
    
    const client = new SlicingDice({
        masterKey: 'MASTER_KEY',
        readKey: 'READ_KEY'
    });
    
    query = "INSERT INTO default([entity-id], name, age) VALUES(1, 'john', 10)";
    
    client.sql(query).then((resp) => {
        console.log(resp);
    }, (err) => {
        console.error(err);
    });

    Output example

    {
       "took":0.063,
       "result":[
           {"COUNT": 3}
       ],
       "count":1,
       "status":"success"
    }

    License

    MIT

    Visit original content creator repository