This Pre–pre-pre-alpha GitHub template repository includes PLANNEDPython library, GNNgraph.py with some basic Sphinx docs … this is mostly about LEARNING and enjoying learning by exploring a graph, which might be like a syllabus, except that it’s more convoluted, branching and tangled … it is about LEARNING in an autodiadactic hands on manner OR doing things the hard way before making them scale OR proceeding from first principles or from scratch OR taking it step-by-step but paying most attention to the assumptions, rather than narrowing the choices down on a multiple choice test.
The GNNgraph project is about learning how to use data APIs and then wrangling data to be able to parse simple json, csv or minimally formatted txt files into a visual, navigable knowledge-graph.
It’s all about the connections and the emergent patterns in data.
Obviously, using reStructuredText to parse this documentation is a deliberate choice which is not just about relying upon the very simple, highly stable docutils codebase.
We envision an annotatable, forkable knowledge-graph which would provide digraph visualization of related modeling approach for comparisons and analyis, as well as ready navigation directly to different executable Python snackable tutorials for learning about how different families of neural network model works … along with an annotated bibliography of related papers with code and data in the area.
This repository itself began its life as a fork the ReadTheDocsTutorial. The larger process of how Sphinx works and how forkable tutorial templates like this are built to be integrated with various version control system providers is itself very interesting to anyone exploring how knowledge can be version controlled then forked, shared, work with the universe of Git tools and part of social issues-driven discussion or even pair programming on a platform like GitHub or GitLab… and will be historically, long after after this project is operational.
Following objectives are tested through this certification
## DATA INGESTION- Import data from a table in a relational database into HDFS
- Import the results of a query from a relational database into HDFS
- Import a table from a relational database into a new or existing Hive table
- Insert or update data from HDFS into a table in a relational database
- Given a Flume configuration file, start a Flume agent
- Given a configured sink and source, configure a Flume memory channel with a specified capacity
## DATA TRANSFORMATION- Write and execute a Pig script
- Load data into a Pig relation without a schema
- Load data into a Pig relation with a schema
- Load data from a Hive table into a Pig relation
- Use Pig to transform data into a specified format
- Transform data to match a given Hive schema
- Group the data of one or more Pig relations
- Use Pig to remove records with null values from a relation
- Store the data from a Pig relation into a folder in HDFS
- Store the data from a Pig relation into a Hive table
- Sort the output of a Pig relation
- Remove the duplicate tuples of a Pig relation
- Specify the number of reduce tasks for a Pig MapReduce job
- Join two datasets using Pig
- Perform a replicated join using Pig
- Run a Pig job using Tez
- Within a Pig script, register a JAR file of User Defined Functions
- Within a Pig script, define an alias for a User Defined Function
- Within a Pig script, invoke a User Defined Function
## DATA ANALYSIS- Write and execute a Hive query
- Define a Hive-managed table
- Define a Hive external table
- Define a partitioned Hive table
- Define a bucketed Hive table
- Define a Hive table from a select query
- Define a Hive table that uses the ORCFile format
- Create a new ORCFile table from the data in an existing non-ORCFile Hive table
- Specify the storage format of a Hive table
- Specify the delimiter of a Hive table
- Load data into a Hive table from a local directory
- Load data into a Hive table from an HDFS directory
- Load data into a Hive table as the result of a query
- Load a compressed data file into a Hive table
- Update a row in a Hive table
- Delete a row from a Hive table
- Insert a new row into a Hive table
- Join two Hive tables
- Run a Hive query using Tez
- Run a Hive query using vectorization
- Output the execution plan for a Hive query
- Use a subquery within a Hive query
- Output data from a Hive query that is totally ordered across multiple reducers
- Set a Hadoop or Hive configuration property from within a Hive query
Google recommends Glide for simplifying the complexity of
managing Android.Graphics.Bitmap within your apps (docs
here).
glidex.forms is small library we can use to improve Xamarin.Forms
image performance on Android by taking a dependency on Glide. See my
post on the topic here.
If you have a “classic” Xamarin.Android app that is not Xamarin.Forms, it could be useful to use the Xamarin.Android.Glide NuGet package. If you want to improve the Xamarin binding for Glide, contribute to it on Github!
How do I use glidex.forms?
To set this library up in your existing project, merely:
Add the glidex.forms NuGet package
Add this one liner after your app’s Forms.Init call:
Xamarin.Forms.Forms.Init(this,bundle);//This forces the custom renderers to be usedAndroid.Glide.Forms.Init(this);LoadApplication(newApp());
How do I know my app is using Glide?
On first use, you may want to enable debug logging:
Android.Glide.Forms.Init(this,debug:true);
glidex.forms will print out log messages in your device log as to what is happening under the hood.
If you want to customize how Glide is used in your app, currently your option is to implement your own IImageViewHandler. See the GlideExtensions class for details.
Comparing Performance
It turns out it is quite difficult to measure performance improvements specifically for images in Xamarin.Forms. Due to the asynchronous nature of how images load, I’ve yet to figure out good points at which to clock times via a Stopwatch.
So instead, I found it much easier to measure memory usage. I wrote a quick class that runs a timer and calls the Android APIs to grab memory usage.
Here is a table of peak memory used via the different sample pages I’ve written:
NOTE: this was a past comparison with Xamarin.Forms 2.5.x
Page
Loaded by
Peak Memory Usage
GridPage
Xamarin.Forms
268,387,112
GridPage
glidex.forms
16,484,584
ViewCellPage
Xamarin.Forms
94,412,136
ViewCellPage
glidex.forms
12,698,112
ImageCellPage
Xamarin.Forms
24,413,600
ImageCellPage
glidex.forms
9,977,272
HugeImagePage
Xamarin.Forms
267,309,792
HugeImagePage
glidex.forms
9,943,184
NOTE: I believe these numbers are in bytes. I restarted the app (release mode) before recording the numbers for each page. Pages with ListViews I scrolled up and down a few times.
Stock XF performance of images is poor due to the amount of
Android.Graphics.Bitmap instances created on each page. Disabling
the Glide library in the sample app causes “out of memory” errors to
happen as images load. You will see empty white squares where this
occurs and get console output.
To try stock Xamarin.Forms behavior yourself, you can remove the
references to glidex and glidex.forms in the glide.forms.sample
project and comment out the Android.Glide.Forms.Init() line.
Features
In my samples, I tested the following types of images:
ImageSource.FromFile with a temp file
ImageSource.FromFile with AndroidResource
ImageSource.FromResource with EmbeddedResource
ImageSource.FromUri with web URLs
ImageSource.FromStream with AndroidAsset
For example, the GridPage loads 400 images into a grid with a random combination of all of the above:
Whether you want to test the client installation or simply check more examples on how the client works, take a look at tests and examples directory.
Installing
In order to install the JavaScript client, you only need to use npm.
npm install slicerjs
Usage
The following code snippet is an example of how to add and query data
using the SlicingDice javascript client. We entry data informing user1@slicingdice.com has age 22 and then query the database for
the number of users with age between 20 and 40 years old.
If this is the first register ever entered into the system,
the answer should be 1.
varSlicingDice=require('slicerjs');// only required for Node.js// Configure the clientconstclient=newSlicingDice({masterKey: 'MASTER_API_KEY',writeKey: 'WRITE_API_KEY',readKey: 'READ_API_KEY'});// Inserting dataconstinsertData={"user1@slicingdice.com": {"age": 22},"auto-create": ["dimension","column"]};client.insert(insertData);// Querying dataconstqueryData={"query-name": "users-between-20-and-40","query": [{"age": {"range": [20,40]}}]};client.countEntity(queryData).then((resp)=>{console.log(resp);},(err)=>{console.err(err);});
Reference
SlicingDice encapsulates logic for sending requests to the API. Its methods are thin layers around the API endpoints, so their parameters and return values are JSON-like Object objects with the same syntax as the API endpoints
Constructor
SlicingDice(apiKeys)
apiKeys (Object) – API key to authenticate requests with the SlicingDice API.
getDatabase()
Get information about current database. This method corresponds to a GET request at /database.
Verify which entities exist in a tabdimensionle (uses default dimension if not provided) given a list of entity IDs. This method corresponds to a POST request at /query/exists/entity.
Retrieve inserted values as well as their relevance for entities matching the given query. This method corresponds to a POST request at /data_extraction/score.
Retrieve inserted values using a SQL syntax. This method corresponds to a POST request at /query/sql.
Query statement
letSlicingDice=require('slicerjs');constclient=newSlicingDice({masterKey: 'MASTER_KEY',readKey: 'READ_KEY'});query="SELECT COUNT(*) FROM default WHERE age BETWEEN 0 AND 49";client.sql(query).then((resp)=>{console.log(resp);},(err)=>{console.error(err);});
Insert statement
letSlicingDice=require('slicerjs');constclient=newSlicingDice({masterKey: 'MASTER_KEY',readKey: 'READ_KEY'});query="INSERT INTO default([entity-id], name, age) VALUES(1, 'john', 10)";client.sql(query).then((resp)=>{console.log(resp);},(err)=>{console.error(err);});
The reflection system was born within EnTT
and is developed and enriched there. This project is designed for those who
are interested only in a header-only, full-featured, non-intrusive and macro
free reflection system which certainly deserves to be treated also separately
due to its quality and its rather peculiar features.
If you use meta and you want to say thanks or support the project, please
consider becoming a
sponsor.
You can help me make the difference.
Many thanks to those who supported me
and still support me today.
Reflection (or rather, its lack) is a trending topic in the C++ world. I looked
for a third-party library that met my needs on the subject, but I always came
across some details that I didn’t like: macros, being intrusive, too many
allocations.
In one word: unsatisfactory.
I finally decided to write a built-in, non-intrusive and macro-free runtime
reflection system for my own.
Maybe I didn’t do better than others or maybe yes. Time will tell me.
Build Instructions
Requirements
To be able to use meta, users must provide a full-featured compiler that
supports at least C++17.
The requirements below are mandatory to compile the tests and to extract the
documentation:
CMake version 3.2 or later.
Doxygen version 1.8 or later.
If you are looking for a C++14 version of meta, feel free to
contact me.
Library
meta is a header-only library. This means that including the factory.hpp and
meta.hpp headers is enough to include the library as a whole and use it.
It’s a matter of adding the following lines to the top of a file:
Then pass the proper -I argument to the compiler to add the src directory to
the include paths.
Documentation
The documentation is based on doxygen.
To build it:
$ cd build
$ cmake .. -DBUILD_DOCS=ON
$ make
The API reference will be created in HTML format within the directory
build/docs/html. To navigate it with your favorite browser:
$ cd build
$ your_favorite_browser docs/html/index.html
It’s also available online for the latest
version.
Tests
To compile and run the tests, meta requires googletest. cmake will download and compile the library before compiling anything else.
In order to build without tests set CMake option BUILD_TESTING=OFF.
To build the most basic set of tests:
$ cd build
$ cmake ..
$ make
$ make test
Crash course
Names and identifiers
The meta system doesn’t force the user to use a specific tool when it comes to
working with names and identifiers. It does this by offering an API that works
with opaque identifiers that for example may or may not be generated by means of
a hashed string.
This means that users can assign any type of identifier to the meta objects, as
long as they are numeric. It doesn’t matter if they are generated at runtime, at
compile-time or with custom functions.
However, the examples in the following sections are all based on
std::hash<std::string_view> as provided by the standard library. Therefore,
where an identifier is required, it’s likely that an instance of this class is
used as follows:
std::hash<std::string_view> hash{};
auto factory = meta::reflect<my_type>(hash("reflected_type"));
For what it’s worth, this is likely completely equivalent to:
auto factory = meta::reflect<my_type>(42);
Obviously, human-readable identifiers are more convenient to use and highly
recommended.
Reflection in a nutshell
Reflection always starts from real types (users cannot reflect imaginary types
and it would not make much sense, we wouldn’t be talking about reflection
anymore).
To reflect a type, the library provides the reflect function:
It accepts the type to reflect as a template parameter and an optional
identifier as an argument. Identifiers are important because users can retrieve
meta types at runtime by searching for them by name. However, there are cases
in which users can be interested in adding features to a reflected type so that
the reflection system can use it correctly under the hood, but they don’t want
to allow searching the type by name.
In both cases, the returned value is a factory object to use to continue
building the meta type.
A factory is such that all its member functions returns the factory itself.
It can be used to extend the reflected type and add the following:
Constructors. Actual constructors can be assigned to a reflected type by
specifying their list of arguments. Free functions (namely, factories) can be
used as well, as long as the return type is the expected one. From a client’s
point of view, nothing changes if a constructor is a free function or an
actual constructor.
Use the ctor member function for this purpose:
Destructors. Free functions can be set as destructors of reflected types.
The purpose is to give users the ability to free up resources that require
special treatment before an object is actually destroyed.
Use the dtor member function for this purpose:
A function should neither delete nor explicitly invoke the destructor of a
given instance.
Data members. Both real data members of the underlying type and static and
global variables, as well as constants of any kind, can be attached to a meta
type. From a client’s point of view, all the variables associated with the
reflected type will appear as if they were part of the type itself.
Use the data member function for this purpose:
This function requires as an argument the identifier to give to the meta data
once created. Users can then access meta data at runtime by searching for them
by name.
Data members can be set also by means of a couple of functions, namely a
setter and a getter. Setters and getters can be either free functions, member
functions or mixed ones, as long as they respect the required signatures.
Refer to the inline documentation for all the details.
Member functions. Both real member functions of the underlying type and free
functions can be attached to a meta type. From a client’s point of view, all
the functions associated with the reflected type will appear as if they were
part of the type itself.
Use the func member function for this purpose:
This function requires as an argument the identifier to give to the meta
function once created. Users can then access meta functions at runtime by
searching for them by name.
Base classes. A base class is such that the underlying type is actually
derived from it. In this case, the reflection system tracks the relationship
and allows for implicit casts at runtime when required.
Use the base member function for this purpose:
From now on, wherever a base_type is required, an instance of derived_type
will also be accepted.
Conversion functions. Actual types can be converted, this is a fact. Just
think of the relationship between a double and an int to see it. Similar
to bases, conversion functions allow users to define conversions that will be
implicitly performed by the reflection system when required.
Use the conv member function for this purpose:
meta::reflect<double>().conv<int>();
That’s all, everything users need to create meta types and enjoy the reflection
system. At first glance it may not seem that much, but users usually learn to
appreciate it over time.
Also, do not forget what these few lines hide under the hood: a built-in,
non-intrusive and macro-free system for reflection in C++. Features that are
definitely worth the price, at least for me.
Any as in any type
The reflection system comes with its own meta any type. It may seem redundant
since C++17 introduced std::any, but it is not.
In fact, the type returned by an std::any is a const reference to an
std::type_info, an implementation defined class that’s not something everyone
wants to see in a software. Furthermore, the class std::type_info suffers from
some design flaws and there is even no way to convert an std::type_info into
a meta type, thus linking the two worlds.
A meta any object provides an API similar to that of its most famous counterpart
and serves the same purpose of being an opaque container for any type of
value.
It minimizes the allocations required, which are almost absent thanks to SBO
techniques. In fact, unless users deal with fat types and create instances of
them though the reflection system, allocations are at zero.
A meta any object can be created by any other object or as an empty container
to initialize later:
// a meta any object that contains an int
meta::any any{0};

// an empty meta any object
meta::any empty{};
It takes the burden of destroying the contained instance when required.
Moreover, it can be used as an opaque container for unmanaged objects if needed:
int value;
meta::any any{std::ref(value)};
In other words, whenever any intercepts a reference_wrapper, it acts as a
reference to the original instance rather than making a copy of it. The
contained object is never destroyed and users must ensure that its lifetime
exceeds that of the container.
A meta any object has a type member function that returns the meta type of the
contained value, if any. The member functions try_cast, cast and convert
are used to know if the underlying object has a given type as a base or if it
can be converted implicitly to it.
Enjoy the runtime
Once the web of reflected types has been constructed, it’s a matter of using it
at runtime where required.
To search for a reflected type there are two options: by type or by name. In
both cases, the search can be done by means of the resolve function:
// search for a reflected type by type
meta::type by_type = meta::resolve<my_type>();

// search for a reflected type by name
meta::type by_name = meta::resolve(hash("reflected_type"));
There exits also a third overload of the resolve function to use to iterate
all the reflected types at once:
resolve([](meta::type type) {
    // ...
});
In all cases, the returned value is an instance of type. This type of objects
offer an API to know the runtime identifier of the type, to iterate all the
meta objects associated with them and even to build or destroy instances of the
underlying type.
Refer to the inline documentation for all the details.
The meta objects that compose a meta type are accessed in the following ways:
Meta constructors. They are accessed by types of arguments:
The returned type is ctor and may be invalid if there is no constructor that
accepts the supplied arguments or at least some types from which they are
derived or to which they can be converted.
A meta constructor offers an API to know the number of arguments, the expected
meta types and to invoke it, therefore to construct a new instance of the
underlying type.
Meta destructor. It’s returned by a dedicated function:
The returned type is dtor and may be invalid if there is no custom
destructor set for the given meta type.
All what a meta destructor has to offer is a way to invoke it on a given
instance. Be aware that the result may not be what is expected.
Meta data. They are accessed by name:
meta::data data = meta::resolve<my_type>().data(hash("member"));
The returned type is data and may be invalid if there is no meta data object
associated with the given identifier.
A meta data object offers an API to query the underlying type (ie to know if
it’s a const or a static one), to get the meta type of the variable and to set
or get the contained value.
The returned type is func and may be invalid if there is no meta function
object associated with the given identifier.
A meta function object offers an API to query the underlying type (ie to know
if it’s a const or a static function), to know the number of arguments, the
meta return type and the meta types of the parameters. In addition, a meta
function object can be used to invoke the underlying function and then get the
return value in the form of meta any object.
Meta bases. They are accessed through the name of the base types:
meta::base base = meta::resolve<derived_type>().base(hash("base"));
The returned type is base and may be invalid if there is no meta base object
associated with the given identifier.
Meta bases aren’t meant to be used directly, even though they are freely
accessible. They expose only a few methods to use to know the meta type of the
base class and to convert a raw pointer between types.
Meta conversion functions. They are accessed by type:
The returned type is conv and may be invalid if there is no meta conversion
function associated with the given type.
The meta conversion functions are as thin as the meta bases and with a very
similar interface. The sole difference is that they return a newly created
instance wrapped in a meta any object when they convert between different
types.
All the objects thus obtained as well as the meta types can be explicitly
converted to a boolean value to check if they are valid:
Furthermore, all meta objects with the exception of meta destructors can be
iterated through an overload that accepts a callback through which to return
them. As an example:
A meta type can also be used to construct or destroy actual instances of the
underlying type.
In particular, the construct member function accepts a variable number of
arguments and searches for a match. It returns a any object that may or may
not be initialized, depending on whether a suitable constructor has been found
or not. On the other side, the destroy member function accepts instances of
any as well as actual objects by reference and invokes the registered
destructor if any.
Be aware that the result of a call to destroy may not be what is expected. The
purpose is to give users the ability to free up resources that require special
treatment and not to actually destroy instances.
Meta types and meta objects in general contain much more than what is said: a
plethora of functions in addition to those listed whose purposes and uses go
unfortunately beyond the scope of this document.
I invite anyone interested in the subject to look at the code, experiment and
read the official documentation to get the best out of this powerful tool.
Policies: the more, the less
Policies are a kind of compile-time directives that can be used when recording
reflection information.
Their purpose is to require slightly different behavior than the default in some
specific cases. For example, when reading a given data member, its value is
returned wrapped in a any object which, by default, makes a copy of it. For
large objects or if the caller wants to access the original instance, this
behavior isn’t desirable. Policies are there to offer a solution to this and
other problems.
There are a few alternatives available at the moment:
The as-is policy, associated with the type meta::as_is_t.
This is the default policy. In general, it should never be used explicitly,
since it’s implicitly selected if no other policy is specified.
In this case, the return values of the functions as well as the properties
exposed as data members are always returned by copy in a dedicated wrapper and
therefore associated with their original meta types.
The as-void policy, associated with the type meta::as_void_t.
Its purpose is to discard the return value of a meta object, whatever it is,
thus making it appear as if its type were void.
If the use with functions is obvious, it must be said that it’s also possible
to use this policy with constructors and data members. In the first case, the
constructor will be invoked but the returned wrapper will actually be empty.
In the second case, instead, the property will not be accessible for
reading.
The as-alias policy, associated with the type meta::as_alias_t
It allows to build wrappers that act as aliases for the objects used to
initialize them. Modifying the object contained in the wrapper for which the
aliasing was requested will make it possible to directly modify the instance
used to initialize the wrapper itself.
This policy works with constructors (for example, when objects are taken from
an external container rather than created on demand), data members and
functions in general (as long as their return types are lvalue references).
Some uses are rather trivial, but it’s useful to note that there are some less
obvious corner cases that can in turn be solved with the use of policies.
Named constants and enums
A special mention should be made for constant values and enums. It wouldn’t be
necessary, but it will help distracted readers.
As mentioned, the data member function can be used to reflect constants of any
type among the other things.
This allows users to create meta types for enums that will work exactly like any
other meta type built from a class. Similarly, arithmetic types can be enriched
with constants of special meaning where required.
Personally, I find it very useful not to export what is the difference between
enums and classes in C++ directly in the space of the reflected types.
All the values thus exported will appear to users as if they were constant data
members of the reflected types.
Exporting constant values or elements from an enum is as simple as ever:
It goes without saying that accessing them is trivial as well. It’s a matter of
doing the following, as with any other data member of a meta type:
my_enum value = meta::resolve<my_enum>().data(hash("a_value")).get({}).cast<my_enum>();
int max = meta::resolve<int>().data(hash("max_int")).get({}).cast<int>();
As a side note, remember that all this happens behind the scenes without any
allocation because of the small object optimization performed by the meta any
class.
Properties and meta objects
Sometimes (for example, when it comes to creating an editor) it might be useful
to be able to attach properties to the meta objects created. Fortunately, this
is possible for most of them.
To attach a property to a meta object, no matter what as long as it supports
properties, it is sufficient to provide an object at the time of construction
such that std::get<0> and std::get<1> are valid for it. In other terms, the
properties are nothing more than key/value pairs users can put in an
std::pair. As an example:
The meta objects that support properties offer then a couple of member functions
named prop to iterate them at once and to search a specific property by key:
// iterate all the properties of a meta type
meta::resolve<my_type>().prop([](meta::prop prop) {
    // ...
});

// search for a given property by name
meta::prop prop = meta::resolve<my_type>().prop(hash("tooltip"));
Meta properties are objects having a fairly poor interface, all in all. They
only provide the key and the value member functions to be used to retrieve
the key and the value contained in the form of meta any objects, respectively.
Unregister types
A type registered with the reflection system can also be unregistered. This
means unregistering all its data members, member functions, conversion functions
and so on. However, the base classes won’t be unregistered, since they don’t
necessarily depend on it. Similarly, implicitly generated types (as an example,
the meta types implicitly generated for function parameters when needed) won’t
be unregistered.
To unregister a type, users can use the unregister function from the global
namespace:
meta::unregister<my_type>();
This function returns a boolean value that is true if the type is actually
registered with the reflection system, false otherwise.
The type can be re-registered later with a completely different name and form.
Contributors
Requests for features, PR, suggestions ad feedback are highly appreciated.
If you find you can help me and want to contribute to the project with your
experience or you do want to get part of the project for some other reasons,
feel free to contact me directly (you can find the mail in the
profile).
I can’t promise that each and every contribution will be accepted, but I can
assure that I’ll do my best to take them all seriously.
If you decide to participate, please see the guidelines for
contributing before to create issues or pull
requests.
Take also a look at the
contributors list to
know who has participated so far.
License
Code and documentation Copyright (c) 2018-2019 Michele Caini.
All Git repositories supported, even private repositories.
For packages, premake5 modules, and assets.
Assets may be hosted using Git LFS, and from urls.
Optionally separating the ZPM package and build files.
Git tags for versioning.
Bugs
When a bug is found, please insert it in the issue tracker, so we can resolve it as quickly as we can.
Contributing
Fork it!
Create your feature branch: git checkout -b my-new-feature
Commit your changes: git commit -am 'Add some feature'
Push to the branch: git push origin my-new-feature
Submit a pull request
License
This project is licensed under the MIT license by Zefiros Software.
Copyright (c) 2017 Zefiros Software.

Permission is hereby granted, free of charge, to any person obtaining a copy
of this software and associated documentation files (the "Software"), to deal
in the Software without restriction, including without limitation the rights
to use, copy, modify, merge, publish, distribute, sublicense, and/or sell
copies of the Software, and to permit persons to whom the Software is
furnished to do so, subject to the following conditions:

The above copyright notice and this permission notice shall be included in
all copies or substantial portions of the Software.

THE SOFTWARE IS PROVIDED "AS IS", WITHOUT WARRANTY OF ANY KIND, EXPRESS OR
IMPLIED, INCLUDING BUT NOT LIMITED TO THE WARRANTIES OF MERCHANTABILITY,
FITNESS FOR A PARTICULAR PURPOSE AND NONINFRINGEMENT. IN NO EVENT SHALL THE
AUTHORS OR COPYRIGHT HOLDERS BE LIABLE FOR ANY CLAIM, DAMAGES OR OTHER
LIABILITY, WHETHER IN AN ACTION OF CONTRACT, TORT OR OTHERWISE, ARISING FROM,
OUT OF OR IN CONNECTION WITH THE SOFTWARE OR THE USE OR OTHER DEALINGS IN
THE SOFTWARE.
The Algorithms with PPV > 75% shown below represent the best AECOPD detection method in UK primary care EHRs.
In summary, an AECOPD can be in found in primary care EHRs by excluding any events on a COPD annual review day and searching for any of the following events:
Any of these events closer together than 14 days are considered part of the same exacerbation event.
*Prescription duration is poorly recorded in CPRD Aurum, therefore any day where a patient receives a prescription for both an antibiotic and oral corticosteroid is counted as an exacerbation event.
5. Save temporary file containing clinical events of interest.
tempfile review_symptoms_LRTI_AECOPD
save `review_symptoms_LRTI_AECOPD'
6. Open prescription events file, e.g. “DrugIssue” file in CPRD Aurum.
use DrugIssue, clear
7. Merge prescription file with DM+D codelists to get prescription events of interest.
merge 1:1 snomedctdescriptionid using `antibiotics_ocs', nogenerate keep(match master)
8. Just keep prescription events of interest.
drop if antibiotic == . & oral_corticosteroid == .
9. Rename date of prescription variable to have the same name as date of clinical event variable so that date of prescription or event are represented with just one variable.
rename issuedate obsdate
10. Append clinical event data to prescription event date to obtain all events of interest in one file.
append using `review_symptoms_LRTI_AECOPD'
11. Sort new combined clinical and prescription event file by date fore each patient so that older events are listed first.
gsort patid obsdate
12. Collapse data by patient and date to get all events on the same day.
14. Calculate total number of symptoms on a specific day.
egen symptoms = rowtotal(breathlessness cough sputum)
order symptoms, after(sputum)
15. Only keep days where both antibiotics and oral corticosteroids were prescribed, days where a patient had 2 or more symptoms and an antibiotic or oral corticosteroid prescribed, days where a patient received an AECOPD code, or days where a patient received a LRTI code.
16. Count any day with the events above as an exacerbation, excluding events closer together than 14 days.
by patid: gen exacerbation = 1 if _n == 1 | obsdate[_n-1] < obsdate-14
17. You now have a list of exacerbations for each patient. If you run the collapse command you can generate the total number of exacerbations for each patient over the given time peroid.
For each framework is developed a small application that handles a counter and a list that can be dynamically appended and cleared by UI.
The well-known JS web frameworks benchmark conducted by Krausest focuses on CPU speed execution, Lighthouse mobile simulation, and memory allocation. While it is valuable to understand the performance of the framework we are working with or considering, an important factor to consider is the size of the final built bundle that contains minified JS code. Nowadays, most devices can easily handle complex websites. However, websites are often refreshed frequently, sometimes with every page change by the user. This raises the issue of the web application’s size, as it affects page loading speed, file interpretation speed, user experience, and network traffic. It is desirable to keep the bundled website as small as possible to minimize network traffic and ensure the best possible user experience in terms of loading time. This project analyzes the sizes of the minified JS bundles for the same simple web application in some of the most commonly used JS frameworks.
Results
React create-react-app
React vite
Angular
Preact Vite
Svelte
Vue vite
Solid
Qwik
Vanilla JS
Size of built JS (KB)
531
140
138
13.7
6.73
53.6
9.96
54.0
1.11
Size of dev folder (KB)
292 511
102 757
481 411
70 761
103 418
107 088
96 100
168 932
3.6
Version
18.2.0
18.2.0
14.2.3
10.13.1
3.55.1
3.2.45
1.6.10
0.20.1
–
Size of minified JS bundle in KB
Lower is better
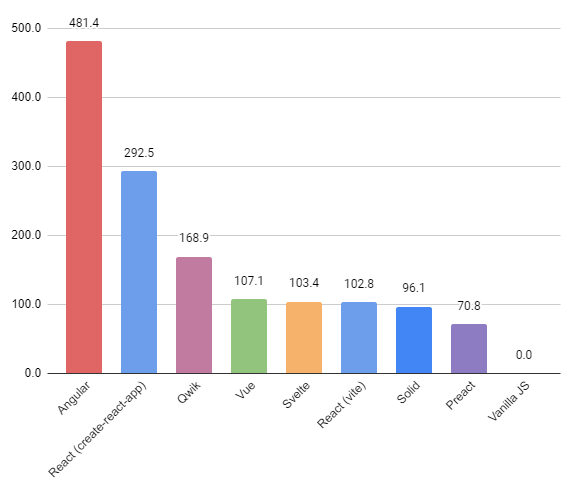
Qwik is a little bit different because all js is not interpreted after the page is rendered, though the minimum bundle size remains large (42.5 KB).
Size of development folder in MB
Including node modules
Lower is better
Expressiveness and Simplicity of syntax
In my opinion:
Svelte and Vue(using Components API) wins the battle, they provides the simplest and most declarative syntax.
Angular has also a pretty clean syntax on top of a nice organisation of components. Though, it can result in a lot of src files to handle.
React and Solid components return JSX that contains JavaScript expression, this focus on more and smaller reusable components (especially compared to Angular components), but have the drawback to mix HTML and JS code together, so it can be confusing, and the MVC is hard to achieve.
In any case, vanilla JS is to be avoided for any kind of projects.
Details on each framework
Solid
Size of development folder: 91.6 MB
Contains:
Files: 2307
Folders: 361
Size of built app: 27.7 KB
Size of minified JS files: 9.96 KB
Components: functions that returns JSX or TSX
State: const [a, setA] = createSignal('val');
Primitives: createEffect(() => console.log(a + ' updated')); and const aa: Type = createMemo(() => a + a;
npm i
npm run dev
npm run build
Svelte
Size of development folder: 98.6 MB
Contains:
Files: 1535
Folders: 341
Size of built app: 9.78 KB
Size of minified JS files: 6.73 KB
Components: .svelte file separating script, template and style
State: let a: Type = 'val';
Primitives: $: console.log(a + ' updated')); Simplest and cleanest syntax so far
npm i
npm run dev
npm run build
Vue
Size of development folder: 102 MB
Contains:
Files: 3267
Folders: 499
Size of built app: 59,2 KB
Size of minified JS files: 53,6 KB
Components: .vue file separating script, template and style. I used components API
State: let a: Type = 'val';
npm i
npm run dev
npm run build
Angular
Size of development folder: 459 MB
Contains:
Files: 40942
Folders: 3676
Size of built app: 153 KB
Size of minified JS files: 138 KB
Components: generated folder containing 4 files, model and controler is a TypeScript class
State: a: Type = 'val'; as a class attribute (in ts file, need to access them with this keyword)
Primitives: Not native to Angular, pretty verbose
npm i
ng s
ng build --configuration production
React (create-react-app)
Size of development folder: 278 MB
Contains:
Files: 36800
Folders: 34805
Size of built app: 540 KB
Size of minified JS files: 531 KB
Components: JSX or TSX files, function that returns JSX
State: const [a, setA] = useState<Type>('val'); as a class attribute
npm i
npm start
npm run build
React (npm init vite@latest)
Size of development folder: 97.9 MB
Contains:
Files: 2254
Folders: 320
Size of built app: 144 KB
Size of minified JS files: 140 KB
npm i
npm run dev
npm run build
Preact (vite)
Size of development folder: 70.8 MB
Contains:
Files: 2452
Folders: 373
Size of built app: 18.8 KB
Size of minified JS files: 13.7 KB
npm i
npm run dev
npm run build
Qwik
Size of development folder: 97.9 MB
Contains:
Files: 6187
Folders: 969
Size of built app: 75.1 KB
Size of minified JS files: 54 KB
npm i
npm start
npm run build
I used SSG (Static Site Generation) for this Qwik projectnpm run qwik add
Vanilla JS
Size of development folder: 3.50 KB
Contains:
Files: 4
Folders: 1
Size of built app: 3.50 KB
Size of JS: 1.11 KB
Components: import js files
State: need to work with the DOM
Primitives: need to code one’s own framework
Expressiveness
Here I put side to side all code to manage the list (creation, push, empty)
Angular
<inputtype="text" (change)="sendMessage($event)" /><app-message*ngFor="let elem of list" [message]="elem"></app-message><button(click)="emptyList()">Empty</button>
SciBlend: Bridging Paraview and Blender for Scientific Visualization v.2.0.0
SciBlend is a powerful add-on for Blender 4.2 that serves as a crucial bridge between Paraview and Blender, revolutionizing the way scientific simulations are visualized. By combining Paraview’s advanced data processing capabilities with Blender’s superior rendering engine, SciBlend enables researchers and scientists to create stunning, photorealistic visualizations of complex scientific data in real-time.
Advanced X3D Import: Import static and animated X3D data with customizable settings.
Material Management: Easily create and apply shared materials to represent different data attributes.
Null Object Manipulation: Create and manipulate null objects for better scene organization and data representation.
Object Grouping: Efficiently group objects by type for improved scene management.
Quick Scene Setup: Set up scenes with predefined lighting and render settings optimized for scientific visualization.
Dynamic Boolean Operations: Perform boolean operations to create cutaways and cross-sections of your data.
User-Friendly Interface: Access all functions through a streamlined UI panel designed for scientists and researchers.
Major Changes from Previous Version
Code Reorganization: The code has been reorganized into separate modules for better maintainability and scalability.
Why SciBlend?
Scientific simulations often produce complex, multi-dimensional data that can be challenging to visualize effectively. While Paraview excels at processing and analyzing this data, it may fall short in creating visually appealing, publication-quality renders. On the other hand, Blender offers unparalleled rendering capabilities but lacks specialized tools for handling scientific datasets.
SciBlend bridges this gap, allowing scientists to:
Seamlessly import Paraview data: Bring your simulation data directly into Blender without losing fidelity.
Create real-time visualizations: Leverage Blender’s real-time rendering capabilities for interactive data exploration.
Produce photorealistic renders: Utilize Blender’s advanced rendering engines to create stunning, publication-ready visualizations.
Enhance scientific communication: Make complex data more accessible and engaging through high-quality visual representations.
Features
Advanced Paraview Import: Import static and animated data from Paraview with customizable settings.
Material Management: Easily manage and apply materials to represent different data attributes.
Null Object Manipulation: Create and manipulate null objects for better scene organization and data representation.
Object Grouping: Efficiently group objects by type for improved scene management.
Quick Scene Setup: Set up scenes with predefined lighting and render settings optimized for scientific visualization.
Dynamic Boolean Operations: Perform boolean operations to create cutaways and cross-sections of your data.
User-Friendly Interface: Access all functions through a streamlined UI panel designed for scientists and researchers.
Requirements
Blender 4.2 or higher
Paraview 5.13 or higher (for initial data processing)
Python 3.11 (bundled with Blender 4.2)
Installation
SciBlend consists of two main components: Paraview Macros for data export and a Blender Addon for data import and visualization. Follow these steps to install both components.
1. Paraview Macros Installation
Locate the export_static.py and export_animation.py files in the Paraview Macros directory of the SciBlend folder.
Open Paraview.
Go to Macros > Import New Macro.
Select the export_static.py file and click “OK”.
Repeat steps 3-4 for export_animation.py.
The macros will now appear in the Macros menu of Paraview.
2. Blender Addon Installation
Locate the SciBlend folder containing all the Blender addon files.
Create a zip file of the entire SciBlend folder. On most systems, you can right-click the folder and select “Compress” or “Create archive”.
Open Blender and go to Edit > Preferences > Add-ons.
Click on Install... and select the SciBlend zip file you created.
Enable the addon by checking the box next to SciBlend.
Exporting Data from Paraview
Now that you have installed the Paraview Macros, you can use them to export your data:
Using Paraview Macros
Static Export
Open your data in Paraview and set up the view as desired.
Select the object you want to export in the Pipeline Browser.
Go to Macros > Export Static.
A dialog will appear asking for the export directory. Enter the full path and click “OK”.
The macro will export the selected object in the specified directory.
Animation Export
Open your animated data in Paraview and set up the view as desired.
Select the object you want to export in the Pipeline Browser.
Go to Macros > Export Animation.
A dialog will appear asking for the export directory. Enter the full path and click “OK”.
Another dialog will ask for the number of frames to export. Enter the desired number and click “OK”.
The macro will export each frame of your animation in the specified directory.
Note: These macros use a simple GUI to ask for the export directory and, in the case of animations, the number of frames. You can select multiple objects in case that you need more than one from the Pipeline Browser.
Usage in Blender
Once the Addon is installed, SciBlend adds a new panel to the 3D Viewport sidebar. Here’s a brief overview of the main functions:
1. Importing Paraview Data
Static Import
Use the “Import Static” option for single-frame data.
Customize import settings such as axis orientation and scale factor to match your Paraview export.
Animated Import
Use “Import Animation” for time-series data.
Specify the range of frames to import using two sliders:
Start Frame Number: Set the first frame of your animation sequence.
End Frame Number: Set the last frame of your animation sequence.
Adjust the orientation of the imported data:
Forward Axis: Choose which axis (X, Y, Z, -X, -Y, -Z) should be considered as “forward” in Blender.
Up Axis: Choose which axis should be considered as “up” in Blender.
Set a scale factor to resize your imported data as needed.
2. Data Visualization
Apply and manage materials to represent different data attributes.
Use null objects and grouping to organize complex datasets.
Perform boolean operations to create cutaways and cross-sections.
3. Scene Setup
Quickly set up a scene with lighting and render settings optimized for scientific visualization.
4. Real-time Interaction
Utilize Blender’s real-time rendering capabilities to interactively explore your data.
5. Final Rendering
Leverage Blender’s advanced rendering engines to create publication-quality images and animations of your scientific data.
Contributing
Contributions are welcome! Feel free to open issues or submit pull requests to improve this project.
Support
For questions, issues, or feature requests, please use the GitHub issue tracker or contact the maintainer at marinfarinajose@gmail.com.