All Git repositories supported, even private repositories.
For packages, premake5 modules, and assets.
Assets may be hosted using Git LFS, and from urls.
Optionally separating the ZPM package and build files.
Git tags for versioning.
Bugs
When a bug is found, please insert it in the issue tracker, so we can resolve it as quickly as we can.
Contributing
Fork it!
Create your feature branch: git checkout -b my-new-feature
Commit your changes: git commit -am 'Add some feature'
Push to the branch: git push origin my-new-feature
Submit a pull request
License
This project is licensed under the MIT license by Zefiros Software.
Copyright (c) 2017 Zefiros Software.

Permission is hereby granted, free of charge, to any person obtaining a copy
of this software and associated documentation files (the "Software"), to deal
in the Software without restriction, including without limitation the rights
to use, copy, modify, merge, publish, distribute, sublicense, and/or sell
copies of the Software, and to permit persons to whom the Software is
furnished to do so, subject to the following conditions:

The above copyright notice and this permission notice shall be included in
all copies or substantial portions of the Software.

THE SOFTWARE IS PROVIDED "AS IS", WITHOUT WARRANTY OF ANY KIND, EXPRESS OR
IMPLIED, INCLUDING BUT NOT LIMITED TO THE WARRANTIES OF MERCHANTABILITY,
FITNESS FOR A PARTICULAR PURPOSE AND NONINFRINGEMENT. IN NO EVENT SHALL THE
AUTHORS OR COPYRIGHT HOLDERS BE LIABLE FOR ANY CLAIM, DAMAGES OR OTHER
LIABILITY, WHETHER IN AN ACTION OF CONTRACT, TORT OR OTHERWISE, ARISING FROM,
OUT OF OR IN CONNECTION WITH THE SOFTWARE OR THE USE OR OTHER DEALINGS IN
THE SOFTWARE.
The Algorithms with PPV > 75% shown below represent the best AECOPD detection method in UK primary care EHRs.
In summary, an AECOPD can be in found in primary care EHRs by excluding any events on a COPD annual review day and searching for any of the following events:
Any of these events closer together than 14 days are considered part of the same exacerbation event.
*Prescription duration is poorly recorded in CPRD Aurum, therefore any day where a patient receives a prescription for both an antibiotic and oral corticosteroid is counted as an exacerbation event.
5. Save temporary file containing clinical events of interest.
tempfile review_symptoms_LRTI_AECOPD
save `review_symptoms_LRTI_AECOPD'
6. Open prescription events file, e.g. “DrugIssue” file in CPRD Aurum.
use DrugIssue, clear
7. Merge prescription file with DM+D codelists to get prescription events of interest.
merge 1:1 snomedctdescriptionid using `antibiotics_ocs', nogenerate keep(match master)
8. Just keep prescription events of interest.
drop if antibiotic == . & oral_corticosteroid == .
9. Rename date of prescription variable to have the same name as date of clinical event variable so that date of prescription or event are represented with just one variable.
rename issuedate obsdate
10. Append clinical event data to prescription event date to obtain all events of interest in one file.
append using `review_symptoms_LRTI_AECOPD'
11. Sort new combined clinical and prescription event file by date fore each patient so that older events are listed first.
gsort patid obsdate
12. Collapse data by patient and date to get all events on the same day.
14. Calculate total number of symptoms on a specific day.
egen symptoms = rowtotal(breathlessness cough sputum)
order symptoms, after(sputum)
15. Only keep days where both antibiotics and oral corticosteroids were prescribed, days where a patient had 2 or more symptoms and an antibiotic or oral corticosteroid prescribed, days where a patient received an AECOPD code, or days where a patient received a LRTI code.
16. Count any day with the events above as an exacerbation, excluding events closer together than 14 days.
by patid: gen exacerbation = 1 if _n == 1 | obsdate[_n-1] < obsdate-14
17. You now have a list of exacerbations for each patient. If you run the collapse command you can generate the total number of exacerbations for each patient over the given time peroid.
For each framework is developed a small application that handles a counter and a list that can be dynamically appended and cleared by UI.
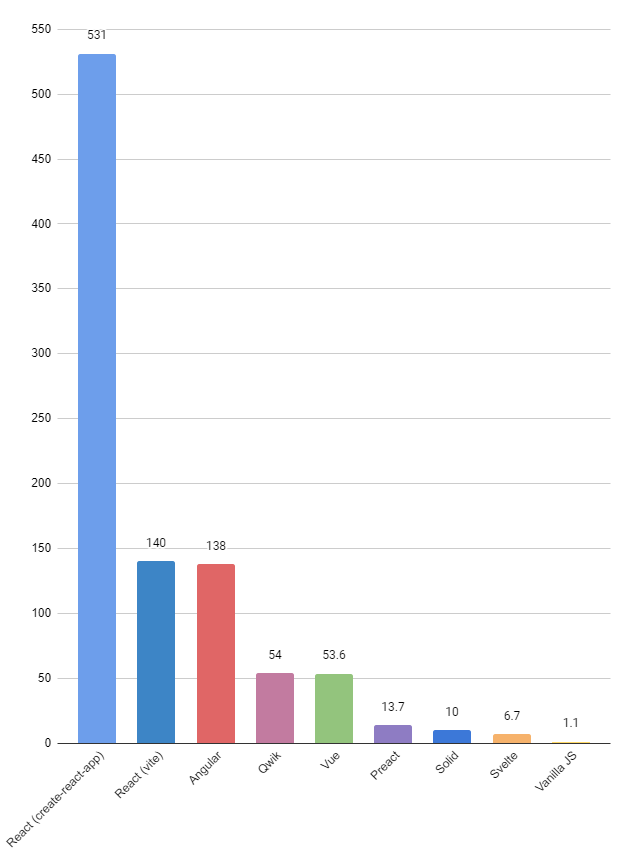
The well-known JS web frameworks benchmark conducted by Krausest focuses on CPU speed execution, Lighthouse mobile simulation, and memory allocation. While it is valuable to understand the performance of the framework we are working with or considering, an important factor to consider is the size of the final built bundle that contains minified JS code. Nowadays, most devices can easily handle complex websites. However, websites are often refreshed frequently, sometimes with every page change by the user. This raises the issue of the web application’s size, as it affects page loading speed, file interpretation speed, user experience, and network traffic. It is desirable to keep the bundled website as small as possible to minimize network traffic and ensure the best possible user experience in terms of loading time. This project analyzes the sizes of the minified JS bundles for the same simple web application in some of the most commonly used JS frameworks.
Results
React create-react-app
React vite
Angular
Preact Vite
Svelte
Vue vite
Solid
Qwik
Vanilla JS
Size of built JS (KB)
531
140
138
13.7
6.73
53.6
9.96
54.0
1.11
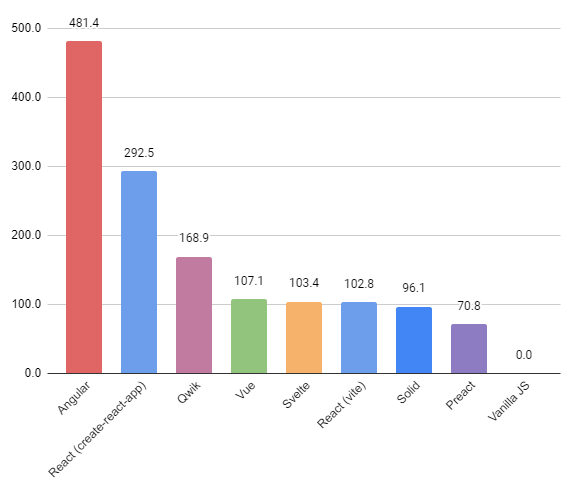
Size of dev folder (KB)
292 511
102 757
481 411
70 761
103 418
107 088
96 100
168 932
3.6
Version
18.2.0
18.2.0
14.2.3
10.13.1
3.55.1
3.2.45
1.6.10
0.20.1
–
Size of minified JS bundle in KB
Lower is better
Qwik is a little bit different because all js is not interpreted after the page is rendered, though the minimum bundle size remains large (42.5 KB).
Size of development folder in MB
Including node modules
Lower is better
Expressiveness and Simplicity of syntax
In my opinion:
Svelte and Vue(using Components API) wins the battle, they provides the simplest and most declarative syntax.
Angular has also a pretty clean syntax on top of a nice organisation of components. Though, it can result in a lot of src files to handle.
React and Solid components return JSX that contains JavaScript expression, this focus on more and smaller reusable components (especially compared to Angular components), but have the drawback to mix HTML and JS code together, so it can be confusing, and the MVC is hard to achieve.
In any case, vanilla JS is to be avoided for any kind of projects.
Details on each framework
Solid
Size of development folder: 91.6 MB
Contains:
Files: 2307
Folders: 361
Size of built app: 27.7 KB
Size of minified JS files: 9.96 KB
Components: functions that returns JSX or TSX
State: const [a, setA] = createSignal('val');
Primitives: createEffect(() => console.log(a + ' updated')); and const aa: Type = createMemo(() => a + a;
npm i
npm run dev
npm run build
Svelte
Size of development folder: 98.6 MB
Contains:
Files: 1535
Folders: 341
Size of built app: 9.78 KB
Size of minified JS files: 6.73 KB
Components: .svelte file separating script, template and style
State: let a: Type = 'val';
Primitives: $: console.log(a + ' updated')); Simplest and cleanest syntax so far
npm i
npm run dev
npm run build
Vue
Size of development folder: 102 MB
Contains:
Files: 3267
Folders: 499
Size of built app: 59,2 KB
Size of minified JS files: 53,6 KB
Components: .vue file separating script, template and style. I used components API
State: let a: Type = 'val';
npm i
npm run dev
npm run build
Angular
Size of development folder: 459 MB
Contains:
Files: 40942
Folders: 3676
Size of built app: 153 KB
Size of minified JS files: 138 KB
Components: generated folder containing 4 files, model and controler is a TypeScript class
State: a: Type = 'val'; as a class attribute (in ts file, need to access them with this keyword)
Primitives: Not native to Angular, pretty verbose
npm i
ng s
ng build --configuration production
React (create-react-app)
Size of development folder: 278 MB
Contains:
Files: 36800
Folders: 34805
Size of built app: 540 KB
Size of minified JS files: 531 KB
Components: JSX or TSX files, function that returns JSX
State: const [a, setA] = useState<Type>('val'); as a class attribute
npm i
npm start
npm run build
React (npm init vite@latest)
Size of development folder: 97.9 MB
Contains:
Files: 2254
Folders: 320
Size of built app: 144 KB
Size of minified JS files: 140 KB
npm i
npm run dev
npm run build
Preact (vite)
Size of development folder: 70.8 MB
Contains:
Files: 2452
Folders: 373
Size of built app: 18.8 KB
Size of minified JS files: 13.7 KB
npm i
npm run dev
npm run build
Qwik
Size of development folder: 97.9 MB
Contains:
Files: 6187
Folders: 969
Size of built app: 75.1 KB
Size of minified JS files: 54 KB
npm i
npm start
npm run build
I used SSG (Static Site Generation) for this Qwik projectnpm run qwik add
Vanilla JS
Size of development folder: 3.50 KB
Contains:
Files: 4
Folders: 1
Size of built app: 3.50 KB
Size of JS: 1.11 KB
Components: import js files
State: need to work with the DOM
Primitives: need to code one’s own framework
Expressiveness
Here I put side to side all code to manage the list (creation, push, empty)
Angular
<inputtype="text" (change)="sendMessage($event)" /><app-message*ngFor="let elem of list" [message]="elem"></app-message><button(click)="emptyList()">Empty</button>
SciBlend: Bridging Paraview and Blender for Scientific Visualization v.2.0.0
SciBlend is a powerful add-on for Blender 4.2 that serves as a crucial bridge between Paraview and Blender, revolutionizing the way scientific simulations are visualized. By combining Paraview’s advanced data processing capabilities with Blender’s superior rendering engine, SciBlend enables researchers and scientists to create stunning, photorealistic visualizations of complex scientific data in real-time.
Advanced X3D Import: Import static and animated X3D data with customizable settings.
Material Management: Easily create and apply shared materials to represent different data attributes.
Null Object Manipulation: Create and manipulate null objects for better scene organization and data representation.
Object Grouping: Efficiently group objects by type for improved scene management.
Quick Scene Setup: Set up scenes with predefined lighting and render settings optimized for scientific visualization.
Dynamic Boolean Operations: Perform boolean operations to create cutaways and cross-sections of your data.
User-Friendly Interface: Access all functions through a streamlined UI panel designed for scientists and researchers.
Major Changes from Previous Version
Code Reorganization: The code has been reorganized into separate modules for better maintainability and scalability.
Why SciBlend?
Scientific simulations often produce complex, multi-dimensional data that can be challenging to visualize effectively. While Paraview excels at processing and analyzing this data, it may fall short in creating visually appealing, publication-quality renders. On the other hand, Blender offers unparalleled rendering capabilities but lacks specialized tools for handling scientific datasets.
SciBlend bridges this gap, allowing scientists to:
Seamlessly import Paraview data: Bring your simulation data directly into Blender without losing fidelity.
Create real-time visualizations: Leverage Blender’s real-time rendering capabilities for interactive data exploration.
Produce photorealistic renders: Utilize Blender’s advanced rendering engines to create stunning, publication-ready visualizations.
Enhance scientific communication: Make complex data more accessible and engaging through high-quality visual representations.
Features
Advanced Paraview Import: Import static and animated data from Paraview with customizable settings.
Material Management: Easily manage and apply materials to represent different data attributes.
Null Object Manipulation: Create and manipulate null objects for better scene organization and data representation.
Object Grouping: Efficiently group objects by type for improved scene management.
Quick Scene Setup: Set up scenes with predefined lighting and render settings optimized for scientific visualization.
Dynamic Boolean Operations: Perform boolean operations to create cutaways and cross-sections of your data.
User-Friendly Interface: Access all functions through a streamlined UI panel designed for scientists and researchers.
Requirements
Blender 4.2 or higher
Paraview 5.13 or higher (for initial data processing)
Python 3.11 (bundled with Blender 4.2)
Installation
SciBlend consists of two main components: Paraview Macros for data export and a Blender Addon for data import and visualization. Follow these steps to install both components.
1. Paraview Macros Installation
Locate the export_static.py and export_animation.py files in the Paraview Macros directory of the SciBlend folder.
Open Paraview.
Go to Macros > Import New Macro.
Select the export_static.py file and click “OK”.
Repeat steps 3-4 for export_animation.py.
The macros will now appear in the Macros menu of Paraview.
2. Blender Addon Installation
Locate the SciBlend folder containing all the Blender addon files.
Create a zip file of the entire SciBlend folder. On most systems, you can right-click the folder and select “Compress” or “Create archive”.
Open Blender and go to Edit > Preferences > Add-ons.
Click on Install... and select the SciBlend zip file you created.
Enable the addon by checking the box next to SciBlend.
Exporting Data from Paraview
Now that you have installed the Paraview Macros, you can use them to export your data:
Using Paraview Macros
Static Export
Open your data in Paraview and set up the view as desired.
Select the object you want to export in the Pipeline Browser.
Go to Macros > Export Static.
A dialog will appear asking for the export directory. Enter the full path and click “OK”.
The macro will export the selected object in the specified directory.
Animation Export
Open your animated data in Paraview and set up the view as desired.
Select the object you want to export in the Pipeline Browser.
Go to Macros > Export Animation.
A dialog will appear asking for the export directory. Enter the full path and click “OK”.
Another dialog will ask for the number of frames to export. Enter the desired number and click “OK”.
The macro will export each frame of your animation in the specified directory.
Note: These macros use a simple GUI to ask for the export directory and, in the case of animations, the number of frames. You can select multiple objects in case that you need more than one from the Pipeline Browser.
Usage in Blender
Once the Addon is installed, SciBlend adds a new panel to the 3D Viewport sidebar. Here’s a brief overview of the main functions:
1. Importing Paraview Data
Static Import
Use the “Import Static” option for single-frame data.
Customize import settings such as axis orientation and scale factor to match your Paraview export.
Animated Import
Use “Import Animation” for time-series data.
Specify the range of frames to import using two sliders:
Start Frame Number: Set the first frame of your animation sequence.
End Frame Number: Set the last frame of your animation sequence.
Adjust the orientation of the imported data:
Forward Axis: Choose which axis (X, Y, Z, -X, -Y, -Z) should be considered as “forward” in Blender.
Up Axis: Choose which axis should be considered as “up” in Blender.
Set a scale factor to resize your imported data as needed.
2. Data Visualization
Apply and manage materials to represent different data attributes.
Use null objects and grouping to organize complex datasets.
Perform boolean operations to create cutaways and cross-sections.
3. Scene Setup
Quickly set up a scene with lighting and render settings optimized for scientific visualization.
4. Real-time Interaction
Utilize Blender’s real-time rendering capabilities to interactively explore your data.
5. Final Rendering
Leverage Blender’s advanced rendering engines to create publication-quality images and animations of your scientific data.
Contributing
Contributions are welcome! Feel free to open issues or submit pull requests to improve this project.
Support
For questions, issues, or feature requests, please use the GitHub issue tracker or contact the maintainer at marinfarinajose@gmail.com.
This is a python application dedicated to creating chess puzzles/tactics from a pgn file.
Also it can download your games from lichess.org and use that file.
Default engine depth to 8, so it’s faster. Before it was nodes=3500000 this is a depth around 20. So it took several minutes to analyze a game. With depth 8 it takes seconds.
You can use the depth argument to change the depth if you want more precision.
chess.pop_count to chess.popcount, because it was failing
This is too complex, give something easy.
There is another option if you don’t want to install and manage python scripts
I created a more user friendly tactics generator and it’s online http://chesstacticsgenerator.vitomd.com
It uses a different approach to create tactics, so probably it will generate a different set of tactics.
Installation
This script requires the Requests and Python-Chess libraries to run, as well as a copy of Stockfish
Is recommended that you use Python 3 and pip3. But it could work with Python 2.7 and pip (probably you will need to install futures pip install futures )
You can download games from multiple tournaments using this command:
python3 download_tournaments.py E14kHVwX tdntXNhy
The arguments are the tournaments ids separate by a space
It will save the games in the games.pgn file
Generate tactics
To execute the generator execute this command. By default it will look for the games.pgn file:
python3 main.py
Arguments
--quiet to reduce the screen output.
--depth=8 select the Stockfish depth analysis. Default is 8 and will take some seconds to analyze a game, with --depth=18 will take around 6 minutes.
--games=ruy_lopez.pgn to select a specific pgn file. Default is games.pgn
--strict=False Use False to generate more tactics but a little more ambiguous. Default is True
--threads=4 Stockfish argument, number of engine threads, default 4
--memory=2048 Stockfish argument, memory in MB to use for engine hashtables, default 2048
--includeBlunder=False If False then generated puzzles won’t include initial blunder move, default is True
--stockfish=./stockfish-x86_64-bmi2 Path to Stockfish binary.
Optional. If omitted, the program will try to locate Stockfish in current directory or download it from the net
The resulting file will be a pgn file called tactics.pgn. Each tactic contains the headers from the source game.
The result header is the tactic result and not the game result. It can be loaded to a Lichess study or to an app like iChess to practice tactics.
Many WordPress developers long for features like Eloquent, Blade, Service Container, and Service Provider to help them build powerful plugins. Falcon is here to change the game and bring these capabilities to your fingertips.
Please note: This plugin provides a series of services and is not intended to be used as a base for creating new plugins.
Features
Powerful Service Container and Service Provider
Query Builder
Eloquent
Template Engine (Blade, Twig)
Logger (Monolog)
Email (PHPMailer)
Laravel Validation
Request Handling
Scheduler
Environment Management
Symfony Var-Dumper (dd, dump)
Carbon
Additional Helpers to develop your plugin fast.
Minimum PHP version: 8.2
Installation
Create Directory: In the wp-content folder, if the mu-plugins folder does not exist, create it. Place the falcon-base-services folder inside it.
Create Loader File: In the root of the mu-plugins folder, create a PHP file with a name of your choice and add the following code:
Note that the contents of the mu-plugins folder do not need to be activated in the WordPress admin and are executed before all other plugins. Also, WordPress does not scan the folders inside mu-plugins unless explicitly instructed.
Install Dependencies: Open the terminal in the falcon-base-services folder and run the following command:
composer install
If you haven’t installed Composer, you can download and install it from this link.
The plugin is now ready to use. Let’s explore its features and how to use them.
Maintenance Mode
If you need to put the site in maintenance mode, simply rename the maintenance.example.php file in the storage folder to maintenance.php. You can also edit the contents of the file as needed.
Environment Variables (ENV)
Items mentioned in the .env.example file are important. Rename the file to .env.
get
You can set your variables in the .env file and use them anywhere in your code like this:
$_ENV['item'];
//orenv('item')
set
To set an item in the global $_ENV var, you can use:
setEnv($key, $value);
Config
You can also use configuration files in your project that return an array.
Place the configuration file in the config folder and access the desired values using the falconConfig($file, $key = null, $folder_path = null) function.
$file: The name of the configuration file.
$key: The key of the requested array. If null, the entire file content is returned.
$folder_path: By default, the path to the configuration files is in the config folder. If you want to have new configurations in your project, you can also specify the path to the new folder.
Service Container – Service Provider
The plugin uses a powerful service container with autowiring capabilities.
Singleton Services: Register a singleton service using:
Resolving Methods: Resolve a method from a class using:
FALCON_CONTAINER->getMethod(Test::class, 'run');
This will automatically resolve any dependencies required by both the class and the method.
To create a service provider, create a class in the app/providers folder and extend the ServiceProvider class. Use the register and boot methods as needed. Then, add the provider’s address in the providers.php file located in the bootstrap folder.
Eloquent, QueryBuilder
All default WordPress tables are available as models in the app/Model folder. WooCommerce tables will be added soon. You can use both the powerful Query Builder and Eloquent to interact with these tables.
Eloquent:
(new \FalconBaseServices\Model\Post())->published()->with('author')->get();
If you want to use a new table as a model, create its class by extending the FalconBaseServices\Model\BaseModel class. If the table does not use the default prefix, set $with_prefix to false:
protected$with_prefix = false;
The rules and usage of models and Query Builder/Eloquent are exactly like the Laravel documentation.
Template
By default, Blade is used as the template engine, which is slightly different in usage from the standard. Pay attention to the example:
falconTemplate()->setViewDir('path to dir')->setView('name of file without extension')
->share(['item' => 'value'])->render();
You can also use Twig. The class derived from the interface app/Services/TemplateEngine/Template.php is available in the path app/Services/TemplateEngine/Implements/Twig.php. Simply add Twig to the plugin via Composer and then edit the file app/Providers/TemplateServiceProvider.php.
The usage is similar to the above example.
Welcome to NoteWizard! This web application is designed to help students stay organized and informed by providing features such as college notes, syllabus tracking, timetables, and important event notifications.
Table of Contents
Introduction
Technologies Used
Features
Getting Started
Usage
Contributing
Contact
Introduction
NoteWizard is a powerful tool for students to manage their academic life efficiently. It offers a range of features that assist in organizing and accessing important information such as class notes, syllabi, timetables, and event notifications. This web application aims to enhance productivity and provide a centralized platform for students to stay on top of their studies.
Technologies Used
The following technologies were used to develop NoteWizard:
HTML5
CSS3
JavaScript
Features
NoteWizard offers the following features:
College Notes: A section where students can upload and access their class notes, organized by subject or course.
Syllabus Tracking: Students can input their course syllabi, track important deadlines, and receive reminders for assignments, exams, and projects.
Timetable: A customizable timetable that allows students to schedule their classes, study sessions, and extracurricular activities.
Event Notifications: Important event notifications, such as registration deadlines, seminars, or guest lectures, can be displayed to keep students informed.
Feel free to customize and expand upon these features based on your specific requirements.
Getting Started
To set up NoteWizard locally, follow these steps:
Clone the repository or download the source code.
Open the project folder in your preferred code editor.
Modify the HTML, CSS, and JavaScript files to customize the application’s content, styling, and functionality.
Save your changes.
Open the index.html file in your web browser to view the application locally.
Usage
Customize NoteWizard to meet the needs of your users. You can enhance existing features, add new functionality, or modify the design and layout. Ensure that the application remains user-friendly and intuitive for students to navigate and utilize effectively.
Contributing
We appreciate your interest in contributing to NoteWizard! If you have any bug reports, suggestions, or enhancements, please feel free to open an issue or submit a pull request. Your contributions will be invaluable in improving the application for the benefit of all users.
Contact
If you have any questions, feedback, or need support, please feel free to contact us via email or any other preferred method.
Thanks for checking out this front-end coding challenge.
Frontend Mentor challenges help you improve your coding skills by building realistic projects.
To do this challenge, you need a basic understanding of HTML, CSS and JavaScript.
The challenge
Your challenge is to build out this crowdfunding product page and get it looking as close to the design as possible.
You can use any tools you like to help you complete the challenge. So if you’ve got something you’d like to practice, feel free to give it a go.
Your users should be able to:
View the optimal layout depending on their device’s screen size
See hover states for interactive elements
Make a selection of which pledge to make
See an updated progress bar and total money raised based on their pledge total after confirming a pledge
See the number of total backers increment by one after confirming a pledge
Toggle whether or not the product is bookmarked
Want some support on the challenge? Join our Slack community and ask questions in the #help channel.
Where to find everything
Your task is to build out the project to the designs inside the /design folder. You will find both a mobile and a desktop version of the design.
The designs are in JPG static format. Using JPGs will mean that you’ll need to use your best judgment for styles such as font-size, padding and margin.
If you would like the design files (we provide Sketch & Figma versions) to inspect the design in more detail, you can subscribe as a PRO member.
You will find all the required assets in the /images folder. The assets are already optimized.
There is also a style-guide.md file containing the information you’ll need, such as color palette and fonts.
Building your project
Feel free to use any workflow that you feel comfortable with. Below is a suggested process, but do not feel like you need to follow these steps:
Initialize your project as a public repository on GitHub. Creating a repo will make it easier to share your code with the community if you need help. If you’re not sure how to do this, have a read-through of this Try Git resource.
Configure your repository to publish your code to a web address. This will also be useful if you need some help during a challenge as you can share the URL for your project with your repo URL. There are a number of ways to do this, and we provide some recommendations below.
Look through the designs to start planning out how you’ll tackle the project. This step is crucial to help you think ahead for CSS classes to create reusable styles.
Before adding any styles, structure your content with HTML. Writing your HTML first can help focus your attention on creating well-structured content.
Write out the base styles for your project, including general content styles, such as font-family and font-size.
Start adding styles to the top of the page and work down. Only move on to the next section once you’re happy you’ve completed the area you’re working on.
Deploying your project
As mentioned above, there are many ways to host your project for free. Our recommend hosts are:
We strongly recommend overwriting this README.md with a custom one. We’ve provided a template inside the README-template.md file in this starter code.
The template provides a guide for what to add. A custom README will help you explain your project and reflect on your learnings. Please feel free to edit our template as much as you like.
Once you’ve added your information to the template, delete this file and rename the README-template.md file to README.md. That will make it show up as your repository’s README file.
Remember, if you’re looking for feedback on your solution, be sure to ask questions when submitting it. The more specific and detailed you are with your questions, the higher the chance you’ll get valuable feedback from the community.
Sharing your solution
There are multiple places you can share your solution:
Share your solution page in the #finished-projects channel of the Slack community.
Tweet @frontendmentor and mention @frontendmentor, including the repo and live URLs in the tweet. We’d love to take a look at what you’ve built and help share it around.
Share your solution on other social channels like LinkedIn.
Blog about your experience building your project. Writing about your workflow, technical choices, and talking through your code is a brilliant way to reinforce what you’ve learned. Great platforms to write on are dev.to, Hashnode, and CodeNewbie.
We provide templates to help you share your solution once you’ve submitted it on the platform. Please do edit them and include specific questions when you’re looking for feedback.
The more specific you are with your questions the more likely it is that another member of the community will give you feedback.
Got feedback for us?
We love receiving feedback! We’re always looking to improve our challenges and our platform. So if you have anything you’d like to mention, please email hi[at]frontendmentor[dot]io.
This challenge is completely free. Please share it with anyone who will find it useful for practice.
This is a collection of Windows scripts to make it easy to setup Windows. This includes application installation, taskbar settings, start menu changes, locale settings, default applications, and more coming soon!
Prerequisites
You may not be able to run the .ps1 script directly on the system due to your Execution Policy. You can run the start.bat file making it easy begin. It’ll only run the installApps.ps1 script by default.
Alternatively, you can run the following in an Administrator Powershell window to allow execution of scripts on your system permanently (Not Recommended).
Set-ExecutionPolicy-ExecutionPolicy Bypass
Getting Started
Download the codebase as a .ZIP.
Run start.bat OR one or both of the below commands in a regular CMD window.
The scripts accept two optional switch parameters which allow setting up ‘sets’ of programs to install and not asking the operator to confirm installation. They are -AppSet and -NoInterrupt respectively.
You can run the following command to install basic applications without prompting for the optional programs.
Alternatively, you can run the following to install basic applications, plus CustomSet1 (defined in the appCollection.ps1 file), without interruptions.
Sets of optional applications are defined in the appCollection.ps1 file. This file must be placed in the same root directory as the installApps.ps1 script is being run. The format of the file must be a valid Hash Table.
Defining Applications
Application names and associated chocolatey package names are located in the installApps.ps1 script. Simply add additional line or two with optional packages, the script will then ask if you want to install it on the next execution.
This script uses and depends on Chocolatey for application installations, and SetUserFTA for setting default applications.