


Desde hace un tiempo Overleaf viene aplicando varios cambios en la plataforma, primero restringieron la cantidad de editores por proyecto, luego cambiaron el tiempo de compilado del plan gratuito y a la fecha del 25 de agosto de 2025 van a aplicar aún más restricciones sobre el tiempo de compilado. Esto hace que tener una manera de trabajar LaTeX localmente sea muy necesaria, de hecho, es impresindible para proyectos grandes como hacer una tesis grado o un proyecto para una materia o personal.
En esta guía vamos a mostrar la forma de hacer esto con SublimeText (latextools) y MikTeX, para los usuarios de Linux también hay una breve guía al final, sin embargo los pasos a seguir son exactamente los mismos que en Windows, salvo la instalación de TeX y los paquetes adicionales, la principal diferencia será que en Linux usaremos TexLive. Para este caso lo haré desde mi sistema operativo de uso personal (Archlinux), sin embargo es totalmente replicable en cualquier distribución y una vez instalados los paquetes podemos configurar todo siguiendo los mismos pasos que en Windows.
¿Por qué SublimeText?, sí, es un Software de paga y sé que a los usuarios de Linux esto no les gusta mucho, pero Sublime nos permite tener un intermedio entre lo velozmente complidado (Vim, Neovim, Emacs …) y lo fácil, pero absurdamente lento (VScode). Personalmente VScode no me gusta ya que no solo es más lento sino que no lo veo tan bien adaptado y personalizable, estéticamente Sublime nos da un mucho mejor resultado (al menos en mi opinión) y no necesariamente debemos pagar para usarlo, está disponible de manera gratuita.
Finalmente, en este repositorio encuentras snippets, piezas de código que permiten decirle a Sublime qué queremos que haga cuando escribimos un comando particular en nuestro documento, por ejemplo, si quiero hacer una matriz de 8×8, sería muy extenso tener que hacerlo a mano, en cambio, estos snippets nos permiten ahorrar mucho tiempo de escritura ya que hacen esto de forma automática, a lo largo de la guía hay varios ejemplos de su uso y en la carpeta SublimeTeX se encuentran todos ellos y son totalmente configurables a tu gusto.
Download
Install
-
Instala primero Sumatra, luego MiKTeX y después ImageMagick. Finalmente, instala Sublime Text.
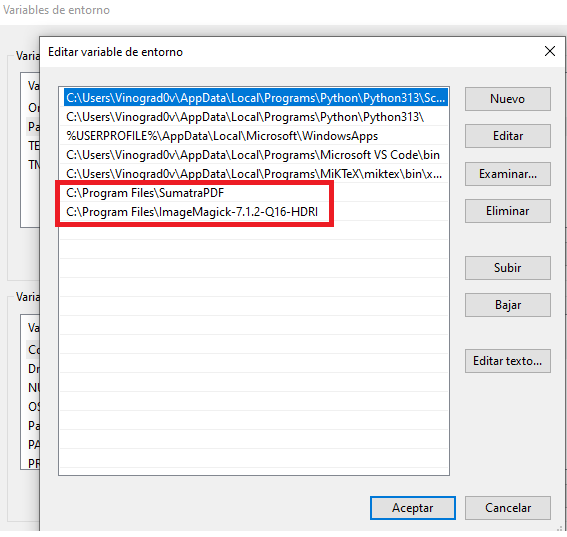
Asegúrate de que ImageMagick se agregue al Path de Windows durante la instalación. La opción debe estar marcada durante la instalación. Si alguna no se añadió debes hacerlo manual, hay muchos videos sobre cómo añadir software a las variables de entorno de Windows, esto se hace para que al compilar se abra automáticamente Sumatra y nos muestre el PDF
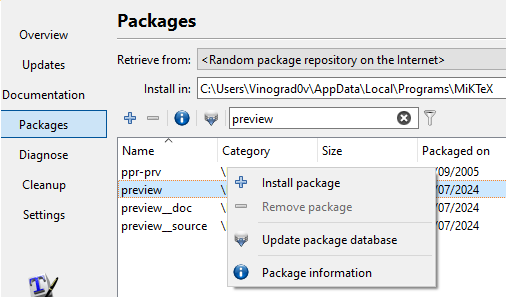
Antes de continuar, puede ser necesario instalar algunos paquetes de LaTeX desde MiKTeX. Para hacerlo, debemos abrir la consola de MiKTeX.
- Ve a Packages e instala “preview” y “mathtools” como se muestra a continuación:
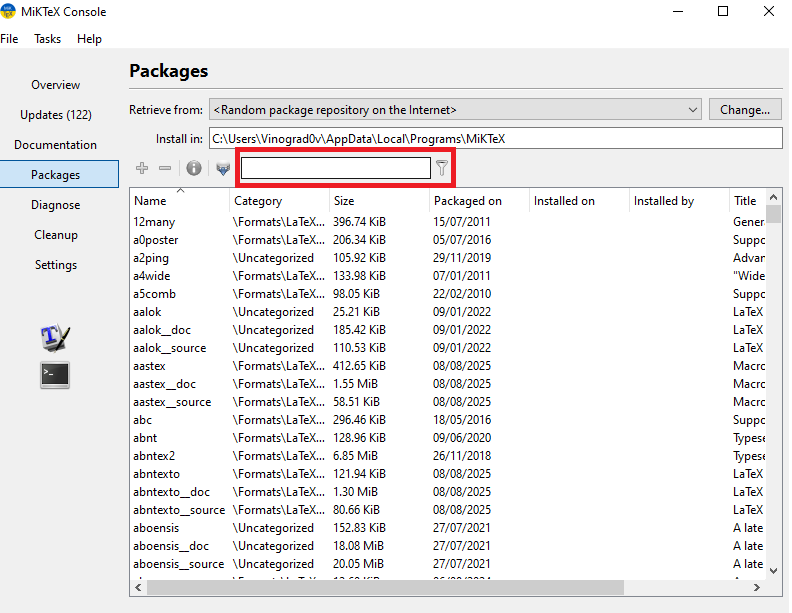
- Debes escribir los nombres de los paquetes en la parte seleccionada.
- Ahora instala como se muestra a continuación:
Una vez que ambos paquetes estén instalados, continúa con la instalación. Recuerda que en el futuro, al compilar uno de tus proyectos, puede que se requiera un paquete que tendrás que instalar desde esta consola.
Además, puede ser recomendable habilitar la instalación automática de paquetes: Ve a Setting

Ahora estoy usando ese Repositorio, me está funcionando bien, así que puedes intentar usarlo entrando en change y seleccionándolo. Pero si algún día tienes problemas con el repositorio, puedes cambiarlo. Yo tuve problemas usando el repositorio por defecto (error de código SSL), por eso cambié el mío a ese, sin embargo si al momento de seguir la guía ya no se encuentra disponible, eres libre de probar cualquiera y ver cómo te va.
Sublime Configs
-
Abre la Command Palette : Presiona Ctrl+Shift+P
-
Escribe install en el cuadro de entrada de la Command Palette, el cual debería autocompletar a Install Package Control. Presiona Enter para seleccionarlo.
-
Sublime Text 3 empezará a instalar Package Control. Esto puede tardar un momento. Una vez instalado, aparecerá un mensaje emergente: Package Control was successfully installed.
-
Ve a Preferences → Package Settings → Package Control → Settings y pega lo siguiente
{
  "bootstrapped": true,
  "in_process_packages":
  [
  ],
  "installed_packages":
  [
  	"A File Icon",
  	"Agila Theme",
  	"AutoPEP8",
  	"ayu",
  	"DistractionFreeWindow",
  	"Dracula Color Scheme",
  	"Fold Comments",
  	"gruvbox",
  	"ImageMagick",
  	"Language - Spanish",
  	"LaTeX Word Count",
  	"LaTeX-cwl",
  	"LaTeXTab",
  	"LaTeXTools",
  	"LaTeXYZ",
  	"Non Text Files",
  	"Package Control",
  	"Python 3",
  	"SideBarEnhancements",
  	"Theme - Gravity",
  ],
}
-
Guarda el archivo. Esto instalará automáticamente todos los paquetes necesarios para la configuración. Espera de 5 a 10 minutos para que la instalación se complete (asegúrate de que la instalación finalice).
-
Luego abre Preferences → Settings y pega lo siguiente allí.
{
  "auto_complete_triggers":
  [
      {
          "characters": ".",
          "selector": "source.python - string - comment - constant.numeric",
      },
      {
          "characters": "\\",
          "selector": "text.tex.latex",
      }
  ],
  "color_scheme": "Packages/ayu/ayu-dark.sublime-color-scheme",
  "default_line_ending": "unix",
  "font_size": 11,
  "ignored_packages":
  [
      "Vintage",
  ],
  "open_externally_patterns":
  [
      "*.jpg",
      "*.jpeg",
      "*.png",
      "*.gif",
      "*.zip",
      "*.pdf"
  ],
  "rulers":
  [
      100
  ],
  "tab_size": 4,
  "theme": "ayu-dark.sublime-theme",
  "translate_tabs_to_spaces": true
}
-
Go to Preferences→Key Bindings and paste the following
[
    { "keys": ["f1"], "command": "toggle_side_bar" },
    { "keys": ["f2"], "command": "distraction_free_window" },
    { "keys": ["f3"], "command": "fold" },
    { "keys": ["f4"], "command": "unfold" },
]
-
Finalmente, ve a Preferences→Package settings→Latex tools→Check system para comprobar si todo está bien o no.
Dark Mode
En Sumatra PDF ve a Settings→Advanced Options. La configuración se abrirá en un nuevo documento de texto. Cambia MainWindowBackground = #11141b y reemplaza el código en FixedPageUI con lo siguiente
FixedPageUI [
	# Light Mode
	# TextColor = #000000
	# BackgroundColor = #ffffff

	# Dark Mode
	TextColor = #ffffff
	BackgroundColor = #11141b
	SelectionColor = #f5fc0c
	WindowMargin = 2 4 2 4
	PageSpacing = 4 4
]
Esto activará el modo oscuro en Sumatra. Para volver al modo claro, simplemente descomenta las líneas bajo Light Mode y comenta las líneas bajo Dark Mode.
FixedPageUI [
	# Light Mode
	TextColor = #000000
	BackgroundColor = #ffffff

	# Dark Mode
	# TextColor = #ffffff
	# BackgroundColor = #11141b
	SelectionColor = #f5fc0c
	WindowMargin = 2 4 2 4
	PageSpacing = 4 4
]
Observa que cambiando las líneas Backgroundcolor y MainWindowBackground en la configuración de Sumatra, podemos hacer que nuestro PDF aparezca en cualquier color que queramos.
Si queremos personalizar Sumatra para que coincida con los colores de nuestro tema de Sublime, solo necesitamos conocer el código Hex del color asociado con el tema (es decir, el color de fondo de Sublime).
Para hacerlo, podemos tomar una captura de pantalla de un área de la pantalla donde sea visible el color que queremos usar, guardar la imagen y usar una herramienta que detecte el color en la imagen (Puedes usar esta).
Compilado
Para compilar tu proyecto en LaTeX, presiona Ctrl+Shift+B y selecciona PDFLaTeX, LuaLaTeX o XeLaTeX dependiendo de cuál compilador requiera tu proyecto.

Después de la primera compilación, deberías poder compilar simplemente usando Ctrl+B. Siempre que requieras cambiar de compilador lo haces nuevamente con Ctrl+Shift+B.
Para compilar el proyecto, debes hacerlo desde el archivo principal del proyecto (por ejemplo, main.tex). Sin embargo, si deseas trabajar en un proyecto grande con diferentes archivos .tex y no quieres cambiar a main.tex cada vez que compilas, puedes agregar la siguiente línea de código al archivo desde el cual deseas compilar:
Por ejemplo: Este proyecto
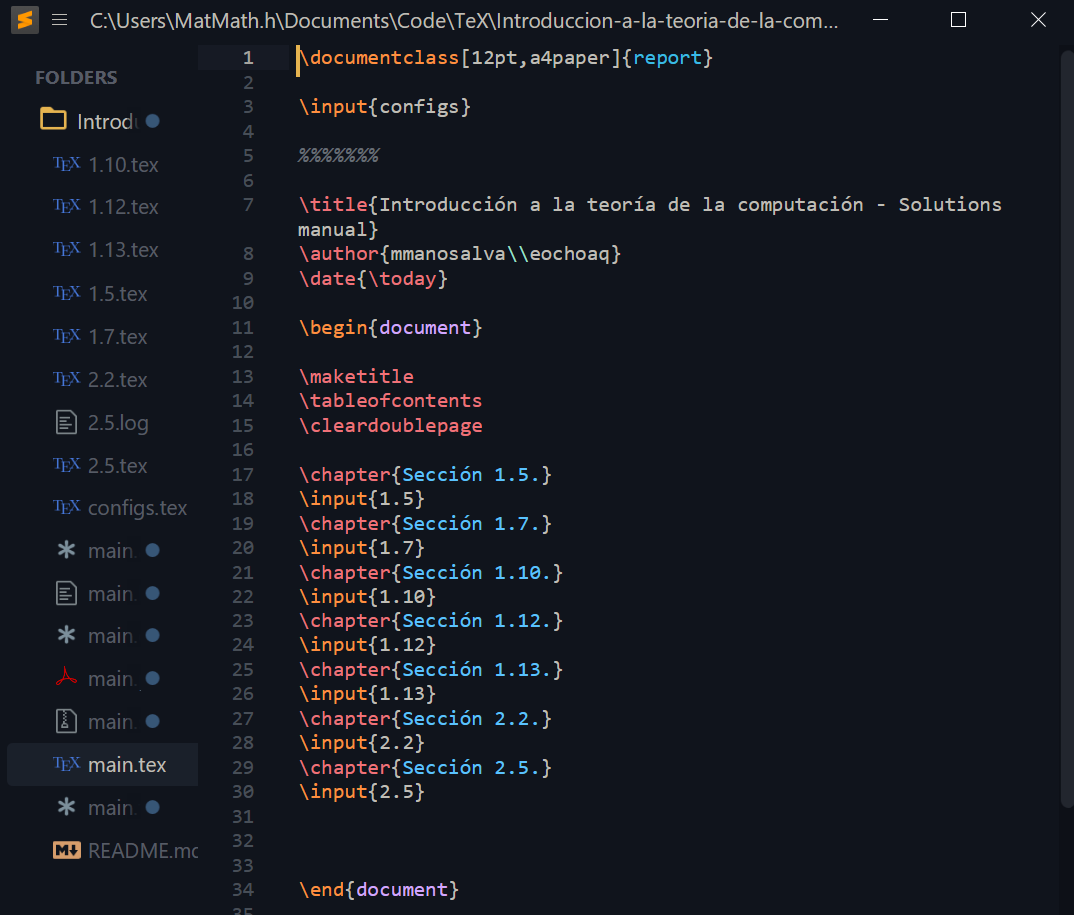
Si estás trabajando en el archivo 2.5.tex y quieres compilar todo el proyecto desde allí, necesitas agregar %!TEX root = main.tex en la primera línea, como se muestra a continuación:

La primera línea de código no afecta nuestro proyecto ya que es un comentario. Lo que hace es indicarle a LatexTools que compile el archivo main.tex en lugar del archivo 2.5.tex. Si tu archivo principal no se llama main, puedes editar la línea de código con el nombre de tu archivo. Y si tienes el archivo desde el que quieres compilar dentro de una carpeta puedes indicarle a LaTeX que salga de esa carpeta añadiendo el comando “../”, sería algo como
Posibles errores
Cuando empieces a usar la interfaz, notarás que al compilar un documento se abre una nueva ventana de Sublime Text. Esto puede ser bastante molesto y pueden aparecer errores como fallos en el autocompletado o caracteres eliminados. Aquí daremos soluciones a estos problemas.
- Ve a
Preferences -> Package Settings -> LaTeXTools-> Settings-User y en la línea:
Cambia true por false y eso solucionará el primer problema.
Ahora, para los fallos de autocompletado:
-
Presiona Ctrl+Shift+P y busca Browse Packages.
-
Abre LaTeXTools/latex_cwl_completion.py
-
Borra o comenta las lineas de 308–312
if is_prefixed:
    completions = [
        (c[0], c[1][1:]) if c[1].startswith("\\") else c
        for c in completions
    ]
Esto soluciona los problemas
Hay un problema que ocurre al usar biblatex y no hacer ninguna cita en todo el documento: básicamente no imprime la bibliografía y el comando \nocite{*} no funciona a menos que hagamos una cita en el documento, esto no es como tal un problema, de cierto modo, ¿para qué tener citas si no vamos a citar nunca?, sin embargo, voy a ofrecer una solución.
Como mencioné, una vez que hacemos al menos una cita en todo el documento, el comando \nocite{*} funciona y el problema se soluciona.
Sin embargo, si no queremos hacer ninguna cita en todo el documento, una solución rápida es hacer una cita fantasma, es decir, una que no afecte el documento final pero resuelva el problema.
Para hacerlo, implementamos lo siguiente en nuestro archivo .tex (si quieres xd o hazlo manual):
\newcommand{\phantomcite}[1]{
    \phantom{\cite{lo que quieras}}
    \nocite{*}
}
Entonces, al final de nuestro documento, antes de usar \printbibliography, ponemos el comando \phantomcite{"aquí coloca cualquier cita de tus referencias"} y eso resolverá el problema.
Este comando ejecuta una cita fantasma y va seguido del comando \nocite{*}, por lo que ya no será necesario usarlo.
\documentclass{article}

\usepackage{biblatex}

\newcommand{\phantomcite}[1]{
    \phantom{\cite{#1}}
    \nocite{*}
}


\addbibresource{sample.bib}

\begin{document}

Test.

\phantomcite{dirac}

\printbibliography
\end{document}
Otra forma de solucionarlo es antes de usar “\nocite{*}” pon “nocite{“alguna referencia”}”:
\documentclass{article}

\usepackage{biblatex}

\addbibresource{sample.bib}

\begin{document}

Test.

\nocite{dirac}
\nocite{*}

\printbibliography
\end{document}
Como se mencionó anteriormente, el problema está relacionado con \nocite{*}.
En esta solución, no es necesario añadir el \phantomcite de la solución anterior.
- IMPORTANTE: Si compilas tu proyecto y este genera la bibliografía, y luego haces cambios en ella, puede que necesites eliminar los archivos generados y volver a compilar. De lo contrario, la bibliografía puede no actualizarse.
El archivo correspondiente es el que tiene la extensión .bbl en la carpeta de tus archivos. Esto no suele ocurrir frecuentemente, cuando hice mi tesis simplemente compilaba una segunda vez y se arreglaba, creo que esto ocurre porque TeX prefiere no tener que compilar todo de nuevo y usa esos archivos residuales para acelerar el resultado, cuando hacemos cambios pequeños en el documento prefiere no hacer el compilado tan largo, pero no es más.
Español
Para añadir el idioma español a Sublime Text y al corrector ortográfico, necesitas descargar la carpeta “Language – Spanish” desde el repositorio y ponerla en la carpeta que se abre cuando ejecutas “Browse Packages”.
Una vez que la carpeta del idioma esté allí, ve en Sublime Text a View -> Dictionary -> Language - Spanish -> Spanish.
Cuando selecciones esto, Sublime Text implementará la corrección en idioma español.
El procedimiento es similar para la autocorrección en inglés, sin embargo, necesitarás buscar los diccionarios ya que no los tengo disponibles.
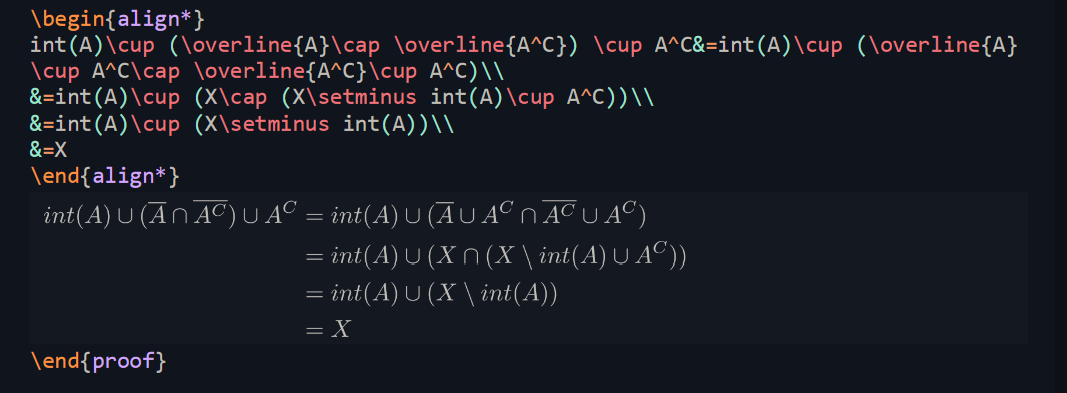
Con este proyecto podrás ver tus ecuaciones sin compilar:
Si ves que la resolución de la vista previa es muy baja, ve a: Preferences -> Package Settings -> LaTeXTools-> Settings-User y luego busca la línea "preview_math_density".
Puedes cambiar valores y probar diferentes resoluciones y densidades de píxeles si lo deseas.
Esta es mi configuración para mi pantalla (2160x1440p):
	// The density of the preview image. The higher the density the bigger the phantom.
	"preview_math_density": 300,
	// If the image is not sharp enough increase this scale to get a better resolution.
	// However also change the density by the same factor to keep the size.
	"preview_math_scale_quotient": 3,
	// If this is true, the image will be rendered at a higher resolution and
	// then scaled down. This generally results in a clearer image.
	"preview_math_hires": true,
El siguiente trabajo está inspirado en el de Gilles Castel (casteldev), muchos de estos snippets son adaptaciones y mejoras de su maravilloso trabajo en LaTeX en Vim.
El propósito de esto es ahorrar la mayor cantidad de tiempo posible al trabajar con LaTeX, pero también ayudar a quienes no son muy expertos en él, especialmente con librerías como TikZ, PSTricks, etc.
Con el tiempo, y especialmente con tu ayuda, espero que estos snippets mejoren.
Todo tipo de sugerencias o colaboraciones son bienvenidas.
Para instalar estos snippets, necesitas descargar la carpeta “SublimeTeX” desde el repositorio y pegarla en la carpeta LatexTools a la que puedes acceder desde “Browse Packages”, como lo hemos venido haciendo.
Después de esto, ya estarán listos para usarlos, así que dejaré algunos gifs de algunos de ellos para que puedas apreciar su utilidad y cómo usarlos, seguidos de una lista de comandos para utilizarlos.
Para usar los snippets solo tienes que escribir el nombre del snippet y presionar tab.
- matriz:(this snippet works for 2×2,3×3,…9×9, if you want a matriz just use pmat)
⚠ RECUERDA️: Para usar los snippets solo necesitas conocer sus nombres, escribirlos y presionar Tab.
Ya hay muchos snippets disponibles y seguiré subiendo más.
Puedes encontrar la lista completa de nombres en el archivo snippets.md.
Mi recomendación es que pruebes todos al menos una vez para entender bien qué hacen.
Después de eso, decide cuáles son más útiles para tu flujo de trabajo.
Si puedes, por favor comparte tus sugerencias — siempre son bienvenidas nuevas ideas de snippets.


